Prototool
Discover the peculiarities of gear mold design for plastic gears and their key characteristics and specialized manufacturing techniques.
The post Gear Mold Design for Plastic Gears appeared first on Prototool written by Prototool.
]]>Prototool
Gear mold design, especially for plastic gears, differs significantly from traditional mold designs. Key parameters such as tooth thickness (the arc length between two sides of a gear tooth), module (a parameter measuring gear size), and pressure angle (the acute angle between the direction of force and direction of motion, excluding friction) require adjustments based on empirical data.
Unlike other processes, gear molds cannot be directly processed based on shrinkage rates. Professional gear and gearbox manufacturers, leveraging long-term experience and collaboration with computer software companies, have developed specialized software for calculating gear mold cavity parameters. This software can directly generate gear parameters and profiles, aiding in gear modification and enhancing tooth accuracy. Let’s delve into the intricacies of plastic gear mold design.
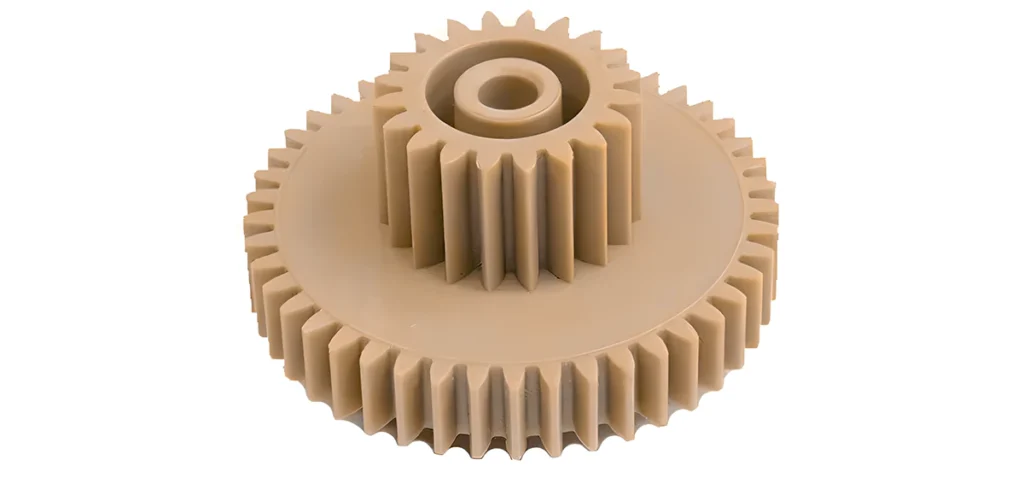
Cavity Design for Plastic Gear Molds
Designing the cavity for a plastic gear mold has always been a technical challenge in the mold industry, primarily due to two reasons:
1. Precision in Plastic Shrinkage Rates:
During the molding process of plastic gears, plastic granules transform into a molten state under high heat and then cool down to form solid plastic gears. The shrinkage rate of plastic during this process is a range value, making it difficult to determine precise shrinkage rates.
2. Non-linear Shrinkage Calculation for Mold Cavities:
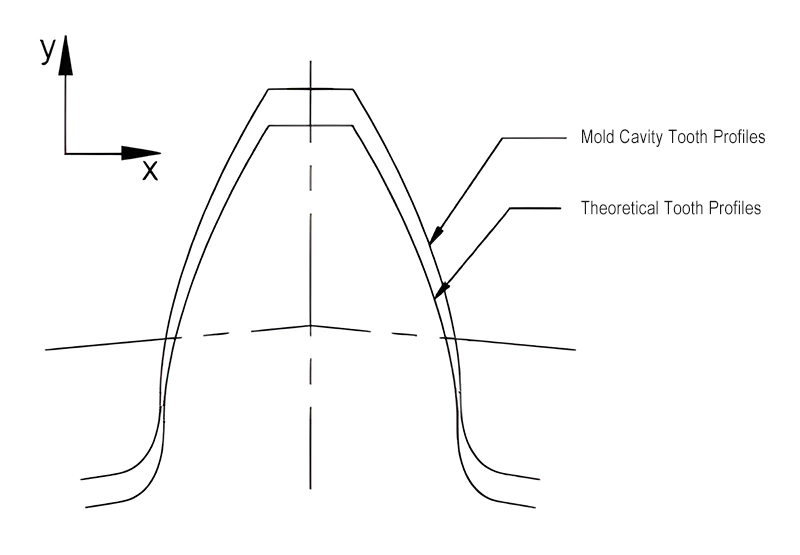
For involute small module plastic gear molds, the mold cavity essentially represents an imaginary gear. This imaginary gear differs from both shifted gears and internal gears. After shrinkage, it becomes the desired plastic gear. The shrinkage on the involute tooth profile of this imaginary gear is not uniform like the isotropic shrinkage seen in general plastic parts. On the gear plane, the shrinkage in the x and y directions is unequal, leading to non-linear shrinkage, as shown in Figure 1. This non-linearity significantly increases the complexity of designing involute plastic gear mold cavities.
The right way to design a gear mold cavity
Facing these technical challenges, using the isotropic shrinkage method for designing mold cavities often yields suboptimal results. Based on years of practical experience and precise estimation of plastic shrinkage rates, we recommend using the variable module method for theoretical design of gear mold cavities, followed by tooth profile correction to ensure accuracy and rationality of the mold cavity.
The variable module method assumes that during various processing stages, the base circle diameter, pitch circle diameter, addendum circle diameter, and dedendum circle diameter of a gear remain consistent, scaling up or down proportionally, similar to the radial dimension changes in simple sleeve-like parts. For a gear’s pitch circle, as determined by the formula d=mz, it is dependent only on the module m and the number of teeth z.
Since the number of teeth on a specific gear is constant, we can consider the change in the pitch circle diameter during processing as a change in the module. This principle implies that the space encompassed by the plastic gear mold cavity is an imaginary gear with constant number of teeth and pressure angle, with its grooves forming the cavity’s tooth profile.
We can calculate the module of this imaginary gear using a proportional method. The formula for this calculation is m’ = (1 + η%)m. In this formula, m’ represents the module of the mold cavity tooth profile, m is the theoretical module of the designed gear, and η% is the plastic’s shrinkage rate. By substituting the module m’ into the corresponding gear calculation formula, the resulting gear represents the imaginary gear of the mold cavity. Practice has shown that the variable module method effectively addresses the challenge of non-linear shrinkage in involute tooth profiles, as demonstrated by the mold cavity product shown in Figure 2.
Gate Design for Plastic Gear Molds
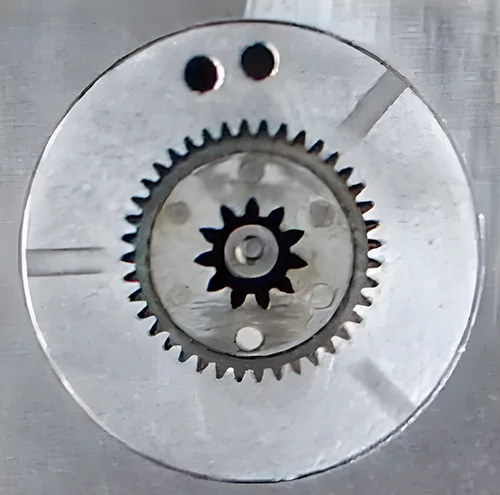
In the process of molding plastic gears, the location of the gate significantly impacts the precision of the gears, especially their radial runout. The distribution form of the gate also crucially affects the overall mechanical properties of the plastic gears. When designing gates for plastic gear molds, if the gear product allows, it is recommended to use a three-point gating system. Ideally, these three points should be located on the same circular arc and evenly distributed, as shown in Figure 3.
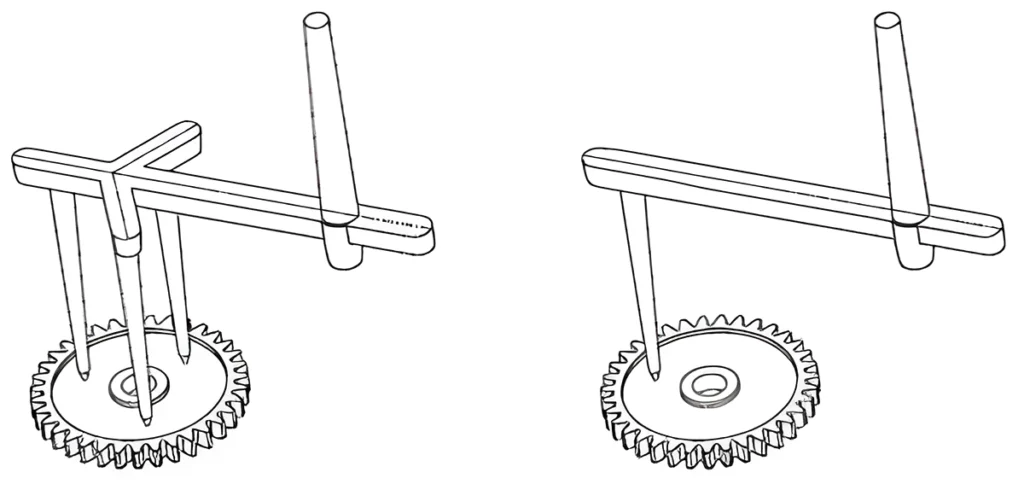
Using a three-point balanced gating system, the plastic melt flows radially from the gates, converging at the flow fronts to form three weld lines. At these weld lines, the orientation of fibers tends to be parallel to the flow front. In gears, this results in fibers being radially distributed at the weld lines, while being randomly distributed in other parts of the gear. This creates areas of low shrinkage along the weld lines. The difference in fiber orientation between the weld lines and the rest of the gear is less pronounced than in gears with a single gate, leading to higher gear precision. Figure 4 shows a schematic comparison of fiber orientation and filling patterns when using a single eccentric gate versus a three-point evenly distributed gate.

Venting Design for Plastic Gear Molds
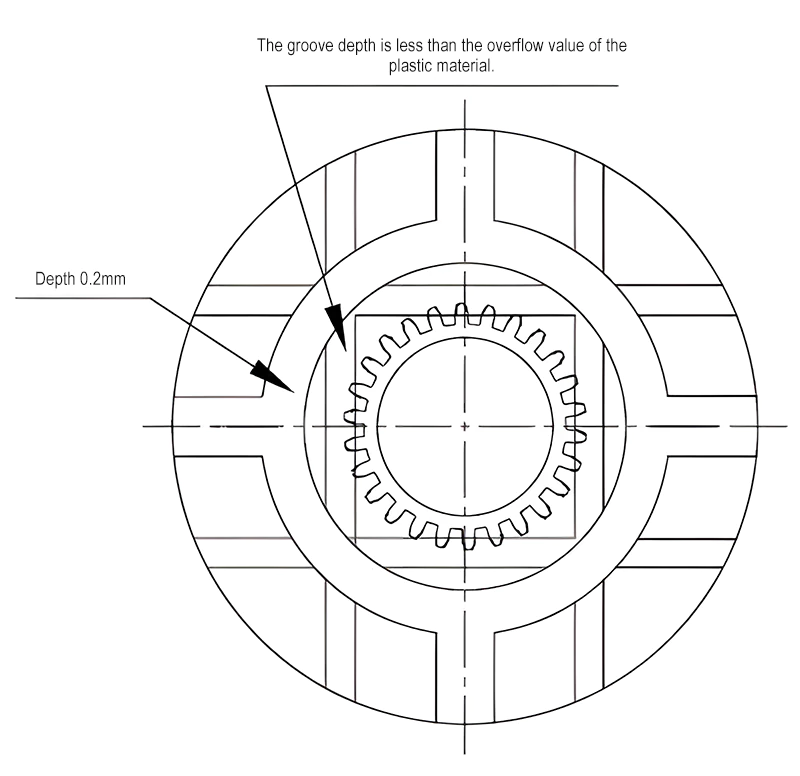
Venting is a crucial aspect to consider in plastic mold design. For plastic gear molds, the design of venting on the tooth surfaces is particularly important. We machine most surfaces of gear molds with a grinding machine. This process ensures a good surface-to-surface fit. However, it tends to result in insufficient filling at the last areas during the injection process. To eliminate trapped air, it is necessary to create venting grooves on the tooth surfaces. Generally, the design of these venting grooves on the tooth surfaces is as shown in Figure 5.
Structural Design of Plastic Gear Molds
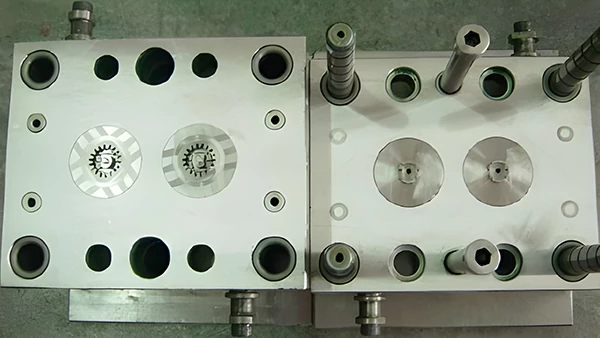
Given that plastic gear injection molding often uses point gates, the mold structure commonly adopts a three-plate design. Figure 6 shows the design diagram of a gear mold, and Figure 7 displays the actual gear mold. The working principle of the gear mold is as follows:
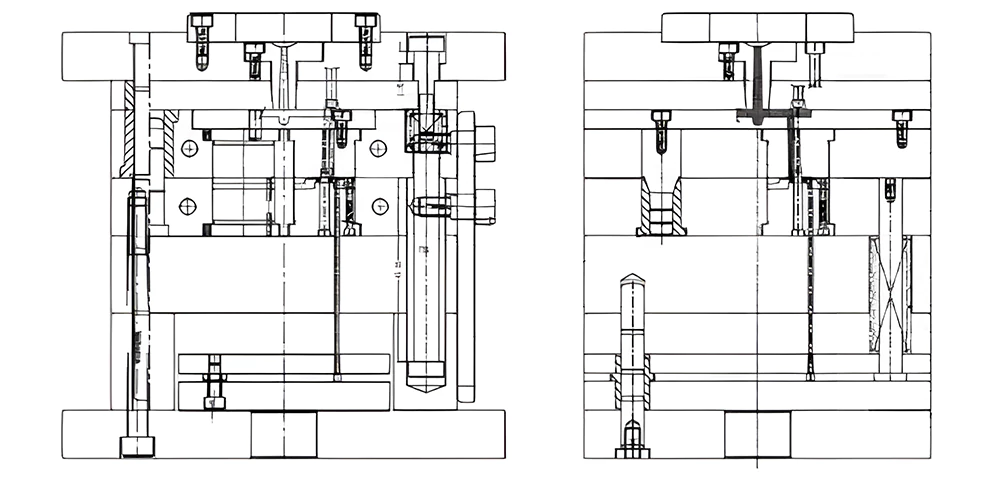
After completing the injection molding action, the movable part of the mold begins to open under the drive of the injection molding machine:
- First Stage of Parting: Due to the action of spring 1, the stripper plate begins to part from Plate A. The sprue puller pin action fixes the main channel on the stripper plate and causes the gate to break away from the product.
- Second Stage of Parting: After the mold opens 95mm, under the action of the tie-bar assembly, the stripper plate begins to separate from the faceplate, releasing the main channel from the sprue bush.
- Third Stage of Parting: As the mold continues to open, under the action of the tie-bar assembly, Plate A begins to part from Plate B. After opening to 90mm, the ejector plate starts to move, ejecting the product. During this process, the guide posts of the ejector plate are used to enhance the balance of ejection. The ejector plate resets under the action of spring 2. This completes the entire mold opening and ejection action.
Manufacturing of Plastic Gear Molds
In the process of molding plastic gears, the gear mold is the key equipment for shaping the plastic gears and ensuring their precision. The plastic gear mold can be divided into two main parts: the gear cavity and the mold frame. The gear cavity, also known as the gear ring, is the most critical and precision-demanding part of the entire gear mold manufacturing process.
1. Gear Cavity Machining
The machining of the gear cavity is key in the manufacturing of plastic gear molds. The molding of plastic gears is a form of ‘replica’ processing. In this process, the cavity’s tooth profile is a deformed template of the gear tooth shape. Therefore, it’s essential to strictly control the dimensional accuracy and surface roughness of the cavity. It is essential to avoid defects such as burrs, eccentricity, and surface scratches. Therefore, a strict gear cavity machining process must be established to ensure the precision of the cavity production.
There are mainly four methods for machining the gear cavity: wire cutting, electrical discharge machining (EDM), electroforming, and beryllium copper alloy casting. Each of these methods has its advantages and disadvantages for machining gear cavities. Manufacturers commonly use wire cutting for involute straight cylindrical gears and generally prefer EDM for helical gears. Additionally, they can machine electrodes used for EDM of gear cavities using wire cutting. For helical gear electrodes with a small helix angle (β≤6°), wire cutting is still applicable.
2. Mold Frame Machining
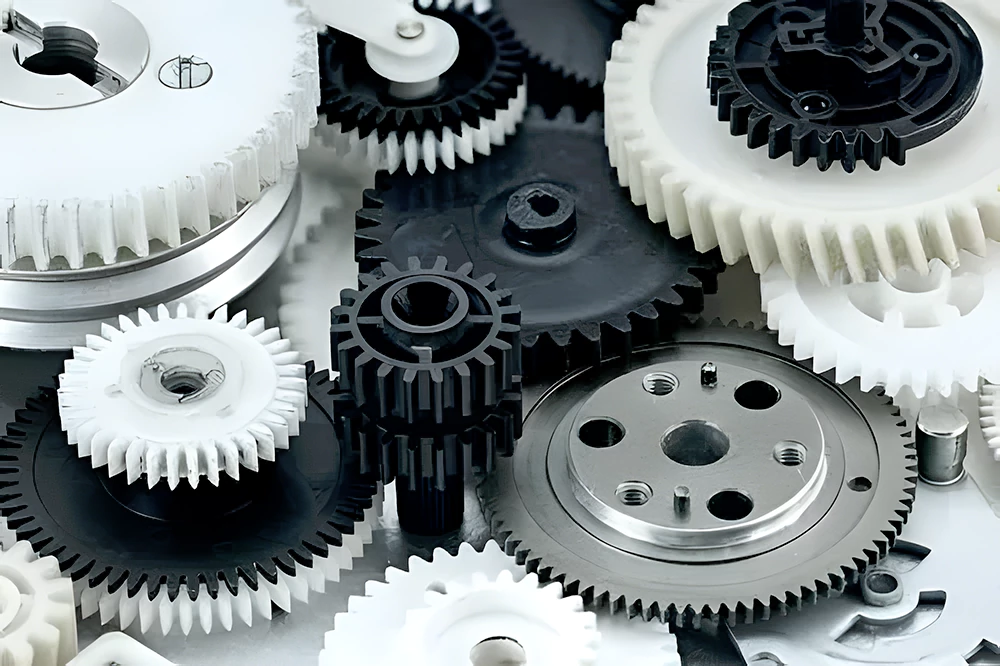
The mold frame, also known as the mold base, is an auxiliary forming part of the gear mold. The process of machining the mold frame is similar to that of common plastic injection molds. Therefore, this article will not elaborate on it. Figure 8 shows the actual image of the gear mold frame machining.
The post Gear Mold Design for Plastic Gears appeared first on Prototool written by Prototool.
]]>Prototool
Explore the essential steps for strategic clearance in plastic mold design, ensuring efficient machining, assembly, and longevity of molds.
The post Creating Strategic Clearance in Mold Design appeared first on Prototool written by Prototool.
]]>Prototool
In plastic mold design, creating strategic clearance is crucial for the seamless operation and assembly of various components. This process ensures that during the design phase, clearances are accurately accounted for, facilitating efficient machining and assembly by the moldmaker. But what are the specific components in plastic mold design that require such clearance?
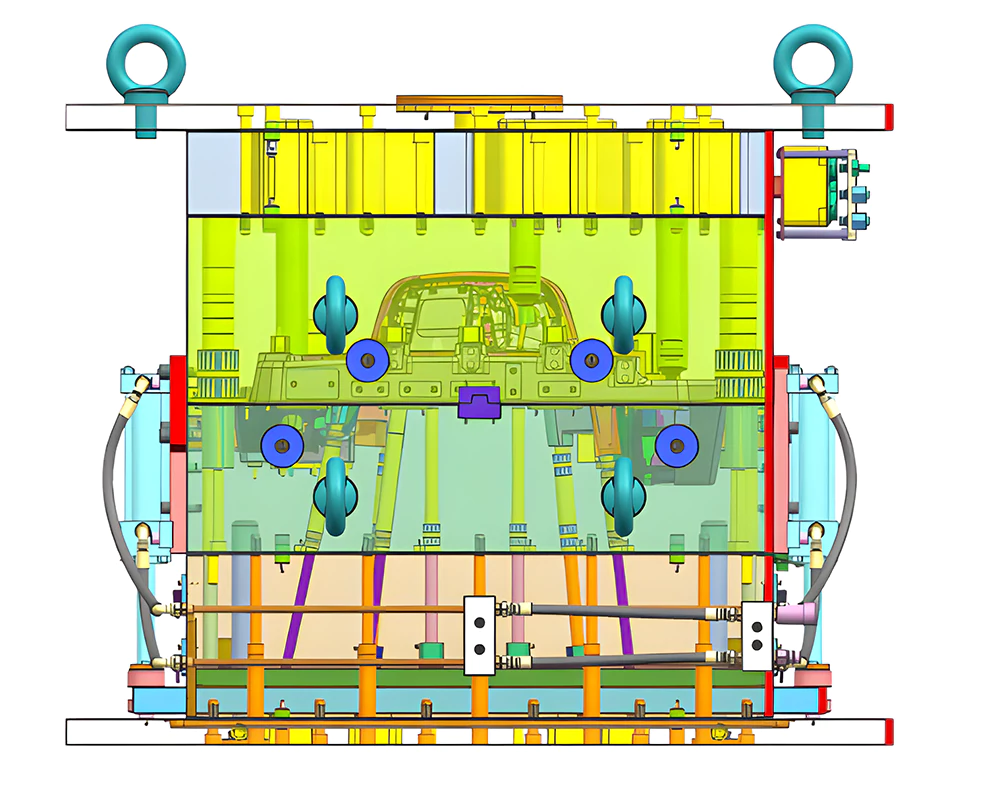
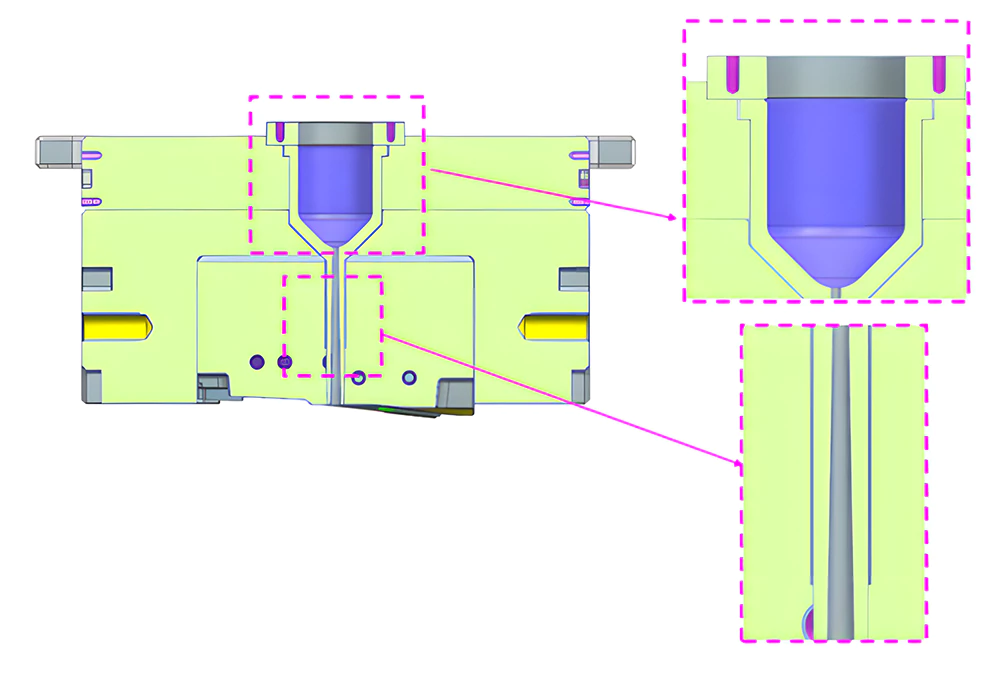
Flange and Sprue Bushing
In mold design, the flange should have a unilateral clearance of 0.1mm with the top clamp plate. The sprue bushing should have a unilateral clearance of 0.5mm with its mounting plate and the mold base, as shown in the diagram. Additionally, a 20mm clearance is reserved for the sprue bushing inside the mold cavity for sealing purposes.
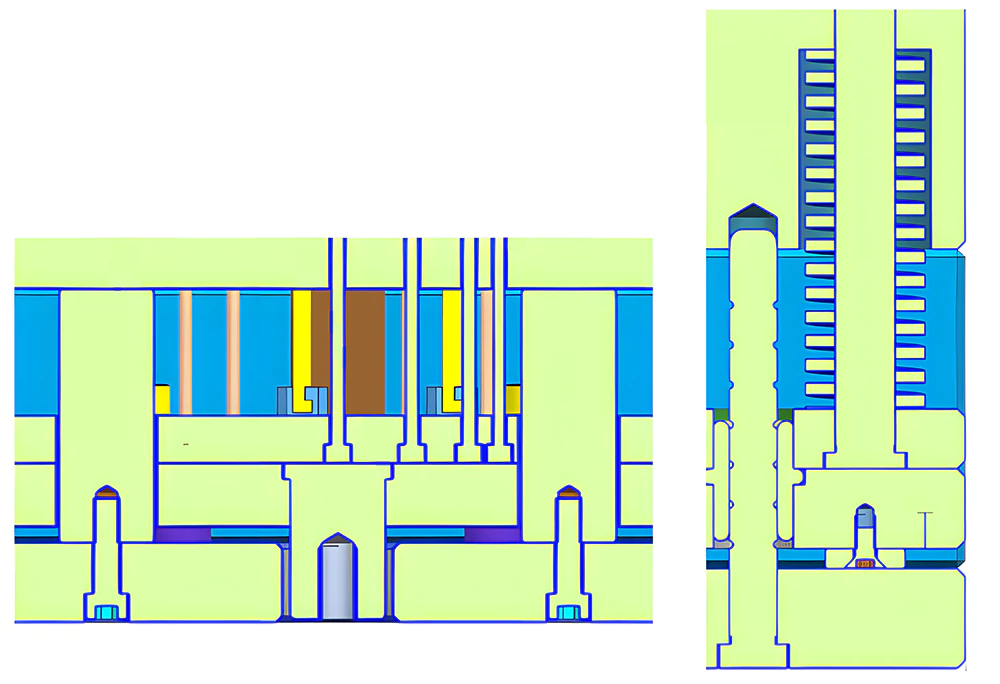
Support Pillars and Ejector Components
The support pillar, ejector blocks, and spring holes follow these clearance standards: For support pillars with a diameter under 50mm, a unilateral clearance of 2mm is required. For those over 50mm in diameter, a 3mm clearance is needed. Ejector pin through-holes on the B-plate and ejector retainer plate require a unilateral clearance of 0.5mm. The spring holes on the B-plate should have a clearance of 0.5-1mm.
Slider Angle Pins and Slide Locking Blocks
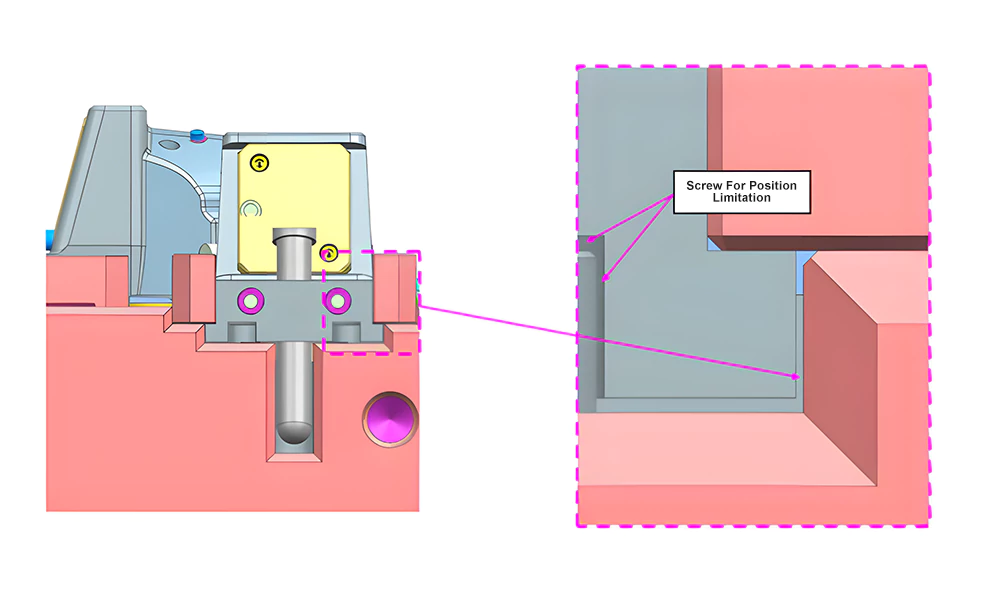
The slider angle pin should have a unilateral clearance of 0.5mm with its corresponding hole. If the pin extends into the B-plate, a 2mm clearance is necessary. The slide locking block should maintain a sliding fit with the B-plate, with a unilateral clearance of 0.5mm. Limit screws should have a 1mm clearance on both sides, and a 2mm clearance at the top with the slide locking block.
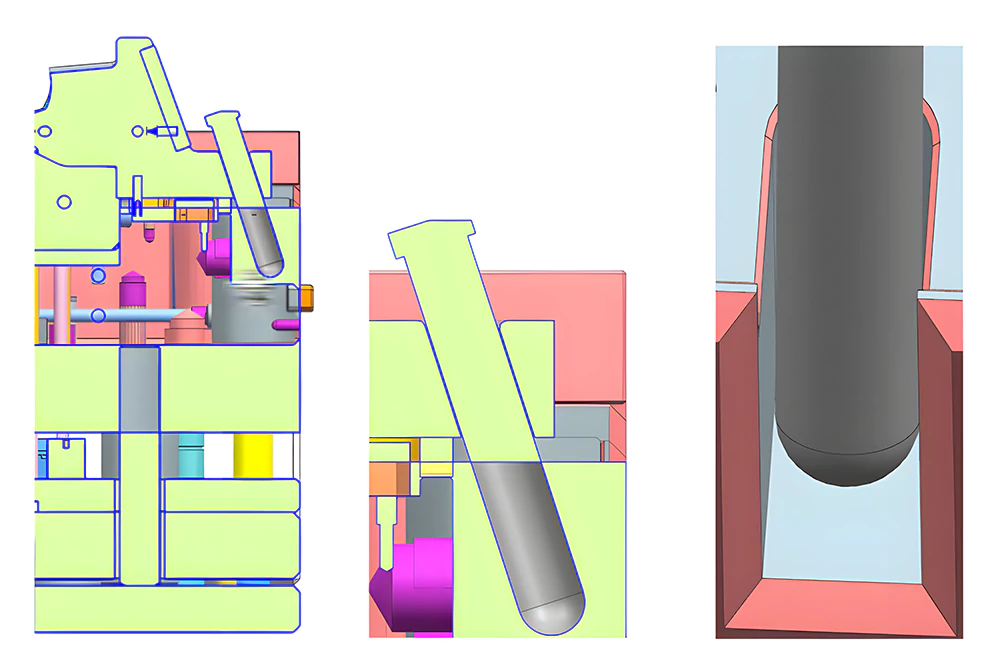
Angled Ejectors and Mold Plates
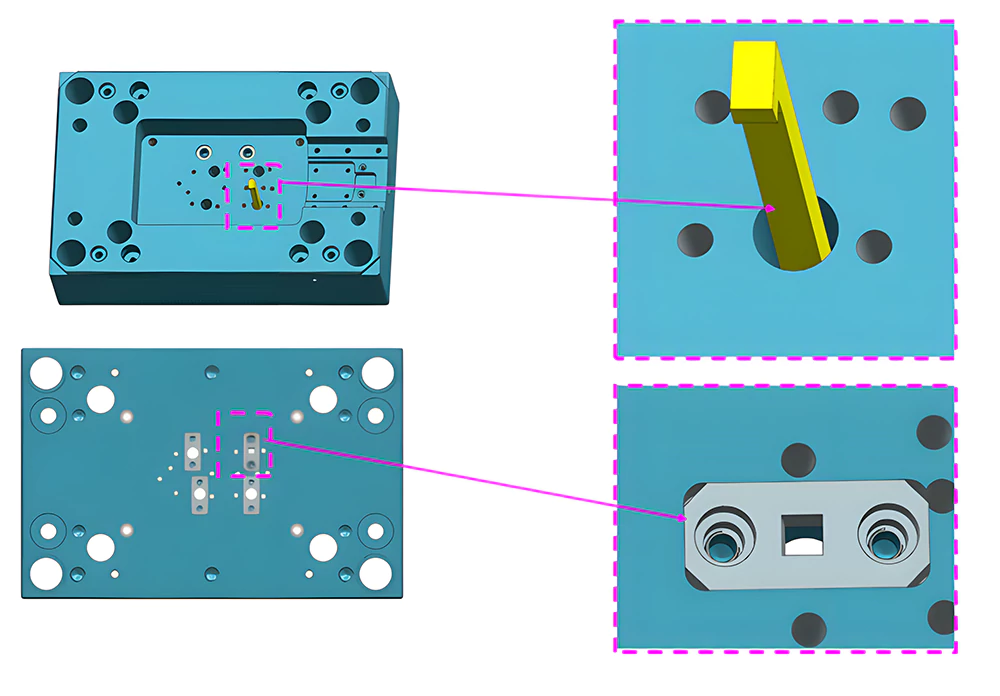
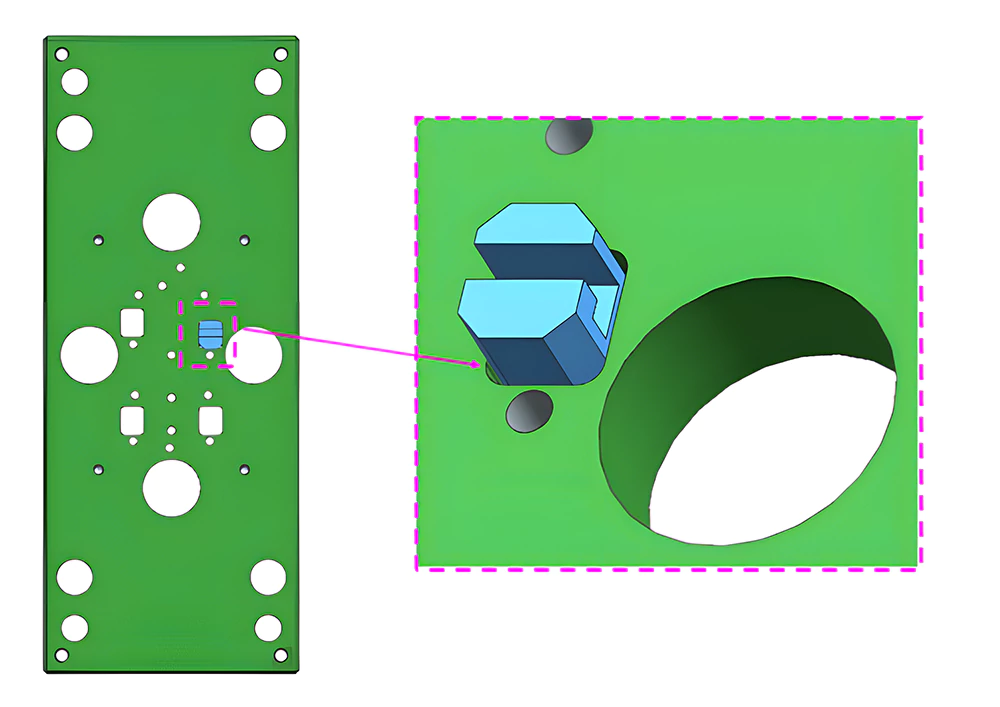
Angled ejectors typically use wire-cut round holes or milling for clearance with the B-plate. The guide blocks for these ejectors, often made of bronze, use a C-angle with rounded corners for clearance with the B-plate. This method facilitates CNC machining.
Mold Plate and Mold Base Clearance
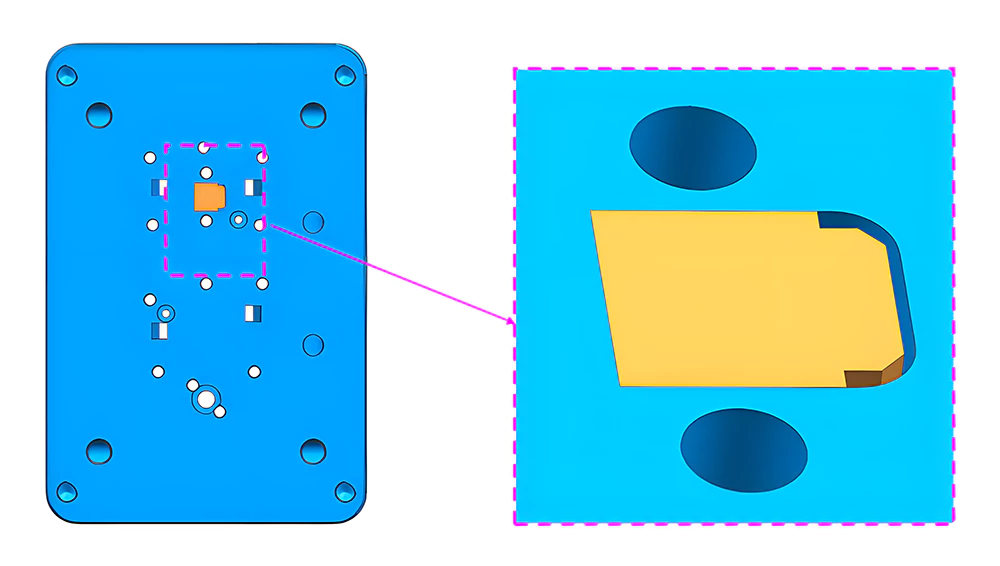
The mold plate screws should have a unilateral clearance of 0.5mm with the mold base. The same clearance applies to the core locking screws with the mold core, and the small tie-bar sleeves with the mold plate. When designing inserts, ensure a unilateral clearance of 2mm with rounded corners for ease of CNC machining and assembly.
Conclusion
Strategic clearance in mold design is a critical aspect that ensures the smooth operation and longevity of the mold. Proper clearance prevents component wear and facilitates easier machining and assembly, contributing to the overall efficiency and quality of the mold-making process.
The post Creating Strategic Clearance in Mold Design appeared first on Prototool written by Prototool.
]]>Prototool
Learn situations where mold modification is sufficient and situations demanding a new mold, along with the cost and steps for modifying it.
The post Mold Modification vs. Building a New Mold: What to Choose? appeared first on Prototool written by Prototool.
]]>Prototool
So you’re having trouble using your existing mold for production and don’t know whether you need mold customization or a new mold to cater to your specific production needs? While the beauty of injection molding lies in the ability to use a single mold for multiple production runs, there are times when you just can’t proceed with the production with the same mold.
Whether it’s design modifications, a shift in resins, or resizing components, the question surfaces: Can mold modification help solve this production need, or is it time to build a new mold?
To help you find that out, this article will delve deeper into the situations when mold adjustment can do the trick and when the only solution is to shift to new mold production. So, without any delay, let’s begin exploring!
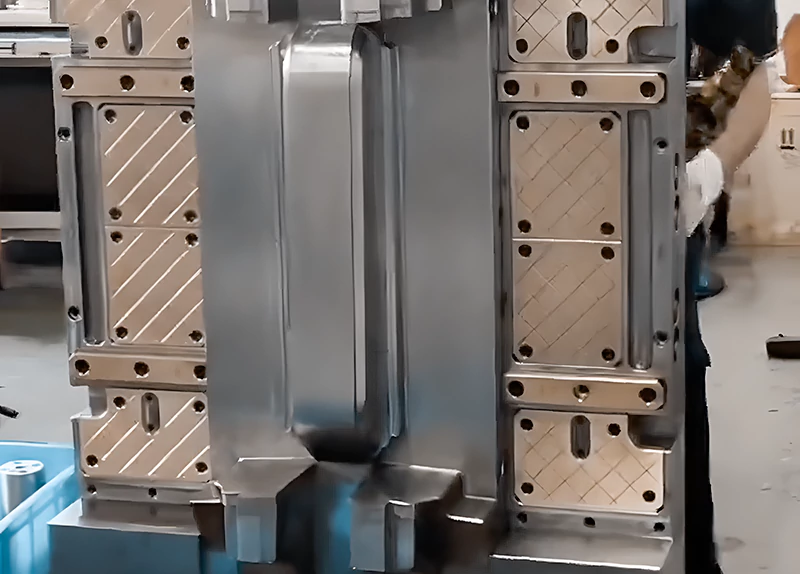
When to Change a Mold?
First things first – when trying to fix a production issue or catering to a specific product’s manufacturing requirements, it’s important to consider mold modification as the primary option.
After all, mold modification involves a strategic approach to enhance efficiency without the hefty investment of creating an entirely new tool. Hence, this mold adjustment is a wise and cost-effective method that offers various advantages for injection molding manufacturing needs.
Here’s a closer look at the situations where mold modification is an ideal choice:
Mold Customization for Size and Shape Alterations
Mold alteration becomes invaluable when needed to resize or reshape a part. Though we can’t add material, the strategic removal of excess metal allows for precise adjustments. Following the alterations, a meticulous analysis ensures that the modified mold meets the required specifications without introducing unforeseen issues.
Incorporating Small Parts or Features
If your need or production requirement is fulfilled just by adding small components or features to an existing mold, it’s worth considering mold revision (provided there is ample space). This approach facilitates mold adaptation, allowing minor improvements without compromising structural integrity.
Opting for a New Mold in Injection Molding
Now you know when to consider mold modification. Yet, what if your issue doesn’t fall into the said categories? That’s where creating an entirely new injection mold is the only solution left to consider.
Of course, this will take significant time and investment. But, if you’re in one of the following situations, opting for a new mold becomes not just a choice but the optimal solution. These situations include:
1. Mold Transformation for Size and Shape Adjustments
When your objective is to reduce the size of a part or alter its shape, the complexities of adding more metal to an existing mold make this process challenging. In such instances, fabricating a new mold tailored to the desired changes instead of opting for mold improvement is a more efficient option.
2. Alterations in Connection Points
Any modifications involving the addition or alteration of elements where parts connect often necessitate the creation of a new mold. This is linked to the potential impact on plastic flow dynamics during injection molding. Creating a new mold here instead of mold revision ensures seamless integration and optimal flow, adding to the quality and efficiency of the production.
3. Adapting to Different Materials
Let’s shift to a different material. Whether due to shortages or discovering inadequacies in the initially chosen one, it may require the fabrication of a new mold.
Why? Because different materials exhibit varied shrinkage rates, and molds are intricately designed to accommodate this shrinkage. Hence, when the new material shrinks less, crafting a smaller mold becomes crucial for precision and efficiency, excluding the option of mold modification.
Comparative Analysis: Creating a New Mold vs. Modifying an Existing Mold
When confronted with decisions regarding injection molding, you might want to be familiar with the costs of creating a new mold of different sizes and complexities. This is another crucial aspect that can help you determine which option is better for your production needs and prepare accordingly.
Notably, the financial landscape for these two approaches varies significantly based on size, complexity, and material specifications.
Considering that, here’s a cost Breakdown:
| Mold Type | Size/Complexity | Estimated Cost Range |
| New Mold (Low-Volume) | Small, Uncomplicated | $2,000 – $6,000 |
| New Mold (Large-Scale, Complex) | Intricate, Multiple Cavities | Tens of Thousands – $100,000+ |
Note: Costs are influenced by tooling material, size, and complexity.
Here, remember that crafting a brand-new mold demands a substantial financial commitment, especially as the size and intricacies increase. For a small, single-cavity mold tailored for low-volume production, costs typically range between $2,000 and $6,000.
However, as molds become more intricate, designed for large-scale production with multiple cavities, costs can increase to tens of thousands, potentially exceeding a staggering $100,000.
In contrast, mold adjustment presents a more economically suitable option. This approach involves strategic adjustments, enhancements, or refinements without necessitating a new mold. The costs associated with mold modification are often more controlled and targeted, aligning with cost-effective adaptation and refinement principles.
What Issues Can be Resolved with Proper Mold Modification?
Did you know? According to a research article, common mold issues often occur and can easily be solved through mold modification. One such challenge is the need for adjustments in cutting depth.
Milling out larger parts of a mold is common, but constraints on minimum cutting depth require careful planning. Gladly, mold modification addresses this by systematically accommodating varying milling equipment requirements, ensuring optimal cutting depth increments.
Parting lines pose another significant concern. Expanding a part at the parting line often demands a new mold, impacting other mold features, such as gates and vents crucial for plastic flow and air escape during injection.
Here, again, mold adjustment proves to be an ideal solution for addressing parting line modifications and maintaining the mold structure while facilitating necessary alterations.
7 Simple Steps for Streamlining Mold Modification
So you know exactly when and why you need to modify your mold. But what about the ‘how’ of efficient mold modification?
Even if you are familiar with the injection molding process, it can be confusing to determine how to streamline mold modification for a more accurate and efficient production process.
To help you understand that, we have listed 7 key steps for mold customization.
1. Optimizing Cutting Depth
Efficiently milling larger mold parts requires careful consideration of the minimum cutting depth. So, plan the milling process, ensuring adequate space for the minimum cutting depth, which varies with milling equipment. Also, be mindful of different milling machines and adjust your cutting in increments according to their specific minimum depths.
2. Managing Parting Lines
Expanding a part at the mold’s parting line in mold customization often requires a new mold, impacting various features. Gates and vents, integral to plastic flow and air escape during injection, are typically fixed in the parting line. Modifying parting lines can compromise mold integrity, making evaluating the need for extensive mold alteration or a complete transformation crucial.
3. Leveraging Micro-Milling Technology
Enhance precision and reduce build times by embracing micro-milling technology for mold refinement. This advanced method excels in holding steel plates flat and parallel, outperforming traditional rotary surface grinding. You can also optimize the mold for increased accuracy by adopting micro-milling, a transformative approach to mold customization.
4. Economizing with Undercuts
When considering mold modification, undercuts provide an economical solution. Unlike extensive additions, undercuts replace side actions without altering the parting line. Hence, strategic mold design incorporating undercuts is a cost-effective way to improve mold without unnecessary alterations when needed.
5. Strategic Material Selection
A suitable material is crucial in mold manufacturing. It’s mainly because each material has distinct advantages and drawbacks, demanding thorough research for informed decision-making. For this, nold adaptation is facilitated by selecting materials that align with specific requirements, ensuring a customized approach to meet the desired mold characteristics.
6. Resin Choice for Shrinkage Management
Resin selection also significantly influences mold performance, particularly in managing shrinkage during cooling. After all, molds are intentionally oversized to accommodate shrink rates. So, test various resins in a single mold, starting with the highest shrink-rate resin. Choosing resins with lesser shrink rates is always preferable to achieve a meticulously crafted mold.
7. Strategic Planning for Flexibility
Designing a mold with modifications in mind is a key cost and time-saving strategy. While some changes may warrant a new mold, proactive planning allows flexibility. Mold modification of certain parts instead of the entire mold becomes a more efficient option, demonstrating the importance of strategic planning in mold refinement.
Summing Up!
Efficiency in injection molding is all about precise planning. Having said that, the need for mold modifications often arises from overlooked design errors rather than deliberate changes. To safeguard production plans and capitalize on mass production benefits, meticulous scrutiny of product design is essential.
For this, it’s smart to choose a professional mold manufacturer like Prototool to ensure you are investing your money to get the right suggestions and a catered mold refinement or new mold creation service according to your product needs.
Choose Prototool for streamlined production and optimized outcomes.
The post Mold Modification vs. Building a New Mold: What to Choose? appeared first on Prototool written by Prototool.
]]>Prototool
Explore the types of injection molds used in production. These classifications are based on the structure of the injection mold.
The post The Eight Types of Injection Molds appeared first on Prototool written by Prototool.
]]>Prototool
In mold types commonly encountered, we find the two-color mold, overmolding, and family mold. These molds are categorized based on specific characteristics and functions, each offering unique advantages in the production process. Today, I will introduce eight types of injection molds classified according to the structure of the mold. It’s important to understand that the mold structures we produce for our clients are based on these eight foundational types.
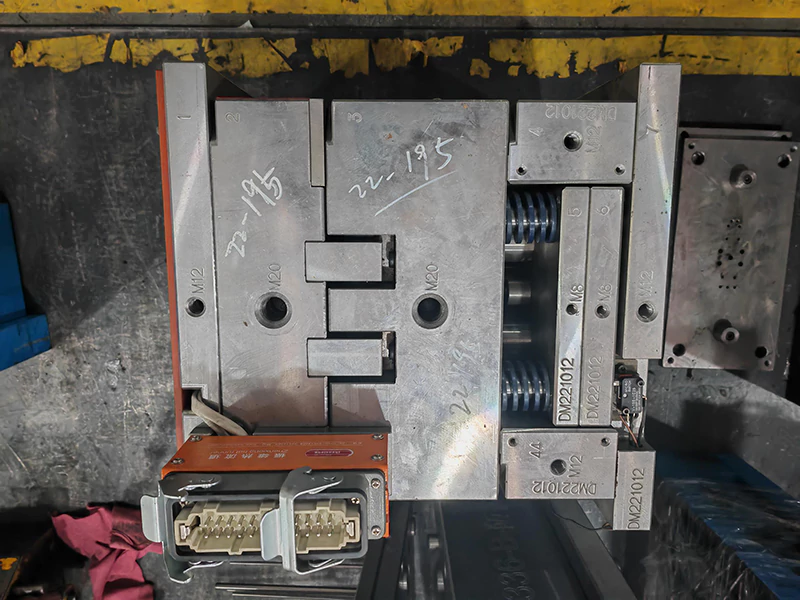
1. Single Parting Surface Injection Mold
When the mold opens, the movable and fixed molds separate, allowing for the removal of the plastic part. This mold is a single parting surface mold, also known as a two-plate mold. It’s the simplest and most basic form in injection molding, adaptable as a single cavity or multi-cavity mold, making it the most widely used type.
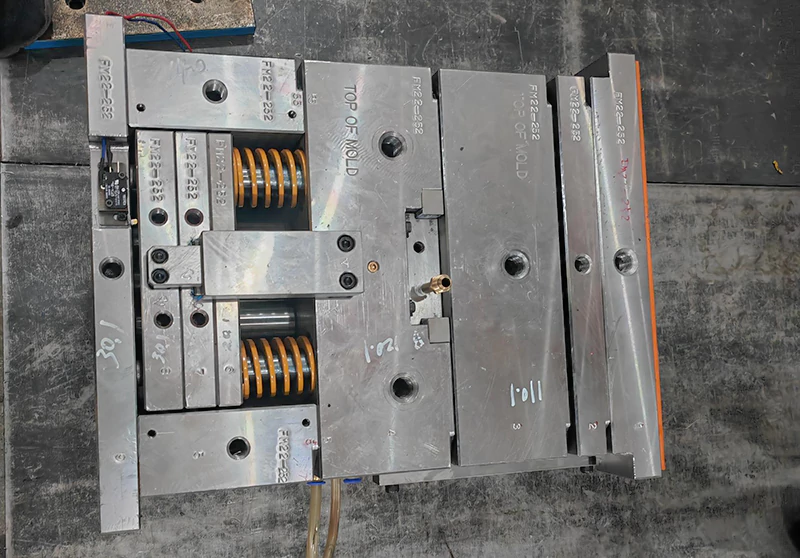
2. Double Parting Surface Injection Mold
The double parting surface injection mold features two parting surfaces. Compared to the single parting surface mold, this type adds a movable middle plate (also known as an active gate plate with gates, runners, and other necessary components) to the fixed mold section, hence also called a three-plate mold (movable mold plate, middle plate, fixed mold plate). We often use it for single or multi-cavity molds with point gate feeding. During mold opening, the middle plate separates a fixed distance from the fixed mold plate on guide pillars. This separation allows for the removal of the runner system.
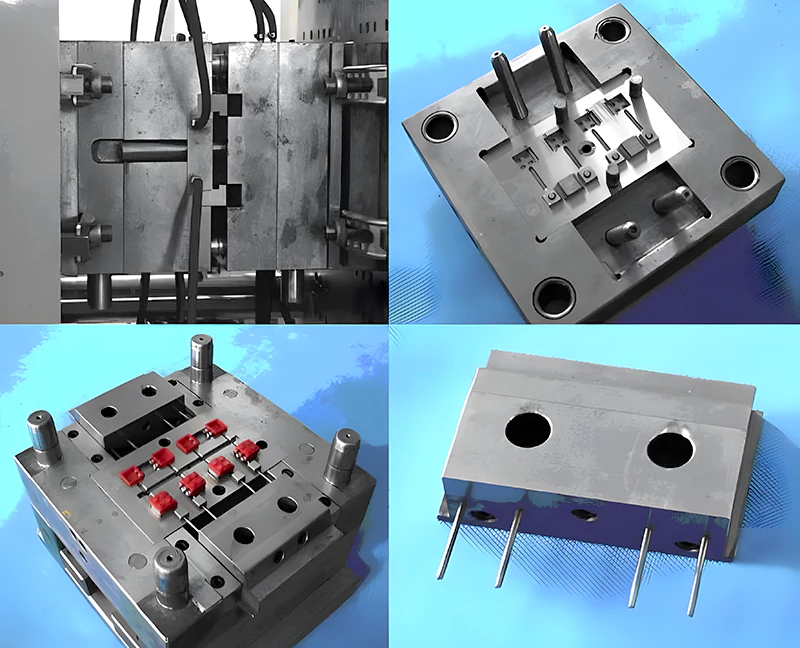
3. Injection Mold with Lateral Parting and Slider
For plastic parts with side holes or undercuts, a laterally slider is used for molding. After injection molding, the core first moves downward. Then, the oblique section of the pin fixed on the cavity plate forces the slider to move outward. Simultaneously, the demolding mechanism’s push rod pushes the push plate to eject the plastic part from the core.
4. Injection Mold with Movable Molding Components
Some plastic parts have special structures requiring movable molding components in the injection mold, such as movable core, movable cavity, movable inserts, movable threaded cores, or rings. These components move out of the mold with the plastic part during demolding and then separate from the part.
5. Automatic Thread Unloading Injection Mold
For threaded plastic parts requiring automatic demolding, the mold can be equipped with a rotatable threaded core or ring. Utilizing the mold opening action, the injection molding machine’s rotating mechanism, or a dedicated transmission device, the threaded core or ring rotates to release the plastic part.
6. Hot Runner Injection Mold
A hot runner mold uses an insulating heating method to keep the plastic between the injection molding machine’s nozzle and the mold cavity in a molten state, eliminating the need for a runner system in the mold. This type includes insulated runner molds and hot runner molds.
7. Right Angle Injection Mold
The right angle injection mold is exclusively for angle injection molding machines. Unlike other molds, the feeding direction during molding is perpendicular to the mold opening and mold closing direction. Its main runner is located on the sides of the mold core and mold cavity parting surfaces, usually with a constant cross-sectional area, differing from molds used in other injection machines. To prevent wear and deformation between the injection machine’s nozzle and the main runner inlet, a replaceable runner insert can be used.
8. Injection Mold with Demolding Mechanism on the Mold Cavity
In most injection molds, manufacturers install the demolding device on the mold core side to facilitate the ejection system in the injection molding machine. However, in practice, due to the shape of some plastic parts, it’s better to keep the part on the mold cavity side for molding. To demold the part from the mold, we must set up a demolding mechanism on the mold cavity side.
Conclusion
In summary, the world of injection molding is diverse and complex, with each of the eight types of injection molds serving a unique purpose in the manufacturing process. From the straightforward single-parting surface mold to the intricate hot runner and right-angle molds, each type offers specific advantages and applications. As technology advances, these types of injection molds will continue to evolve, further enhancing the capabilities and possibilities within the realm of injection molding.
The post The Eight Types of Injection Molds appeared first on Prototool written by Prototool.
]]>Prototool
Check the key principles for designing effective injection mold cooling systems and see how suppliers ensure the quality of their products.
The post Principles of Designing Injection Mold Cooling Systems appeared first on Prototool written by Prototool.
]]>Prototool
The temperature control system of an injection mold directly impacts the quality of the molded product and the efficiency of production. High temperatures on the mold cavity surface can lead to flash at the parting line and sink marks in thicker sections of the plastic part. Conversely, low temperatures can cause poor filling and weak weld lines. Uneven temperatures across the mold cavity and moving mold surfaces can introduce internal stresses, leading to warping and deformation in the molding process. Thus, the temperature control system, akin to the gating system, is crucial in mold design and warrants significant attention.
Design Principles for Injection Mold Cooling Systems
To enhance the efficiency of the cooling system and ensure uniform temperature distribution across the mold cavity, the following principles should be adhered to:
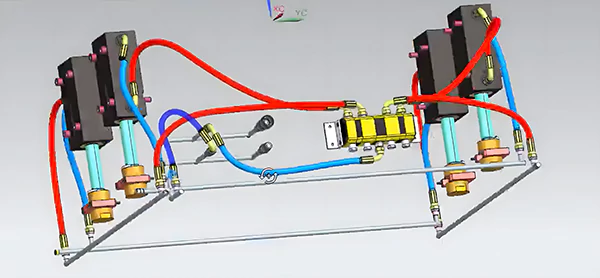
1. Optimal Cooling Method and Circuit Placement:
During mold design, prioritize the cooling method and circuit placement, ensuring sufficient space for turbulent water flow in the cooling channels. The cooling circuit should meet the molding process requirements, providing ample, uniform, and balanced cooling.
2. Temperature Differential and Flow Dynamics:
Consider the temperature differential at the inlet and outlet and calculate the flow pressure drop to determine the appropriate diameter and length of the cooling channels. Aim for a lower temperature differential (5°C for standard molds, 2°C for precision molds). The length of the cooling circuit should be between 1.2 to 1.5 meters, with a flow speed of 0-1.0 m/s, and the number of bends should not exceed 15. For larger molds, consider multiple independent circuits to increase coolant flow and reduce pressure loss, enhancing heat transfer efficiency. Multiple narrow cooling channels are preferable to a single large diameter channel.
3. Number and Size of Cooling Channels:
Maximize the number and size of cooling channels, with the diameter depending on the shape of the plastic part and the mold structure. The number, spacing, and proximity of the channels to the molding space significantly impact mold temperature control.
4. Strategic Cooling Near the Gate:
The area near the gate, often in contact with the injection molding machine’s nozzle, tends to have higher temperatures and requires intensified cooling. If necessary, design a separate cooling channel for this area.
5. Avoid Cooling at Weld Lines:
Since weld lines are the coolest areas, avoid placing cooling channels near them to prevent exacerbating weld line defects and reducing the strength of the plastic part at these points.
6. Placement of Water Inlet and Outlet Connections:
Position these connections on the non-operational side of the mold.
7. Separate Cooling Circuits for Movable and Fixed Molds:
Ensure balanced cooling for both the cavity and the core, with special attention to the cooling efficiency of the core to guarantee uniform cooling and shrinkage of the plastic part.
Key Considerations in Cooling System Design
1. Cooling Methods for Different Molds:
Use rapid cooling for standard molds to shorten the molding cycle and gradual cooling for precision molds, incorporating mold thermometers.
2. Minimize Use of Sealing Rings:
Design cooling circuits with dual straight-through paths for easier maintenance. Ensure leak-proof seals and check for water leakage at the seals and nozzles.
3. Directional Cooling for Specific Materials:
For materials like PE with significant shrinkage, orient the cooling channels along the shrinkage direction to prevent deformation. Align the channels with the layout of the mold cavity.
4. Cooling Circuit Configuration:
For molds with a single inlet and outlet, use a series connection for the cooling channels. For parallel connections, ensure each circuit has a flow control device and flow meter to maintain uniform cooling conditions.
5. Enhancing Cooling in Challenging Areas:
In areas where cooling is less effective or structurally limited, consider using materials with high thermal conductivity, like beryllium copper or copper alloys, or a heat-conducting rod structure. Provide cooling for cores, inserts, and sliders as necessary.
6. Color-Coding and Labeling:
Mark the water inlet with red and the outlet with blue. Label the cooling water inlets and outlets on the movable and fixed mold plates with “IN” and “OUT” in English, and group the water channels accordingly.
The post Principles of Designing Injection Mold Cooling Systems appeared first on Prototool written by Prototool.
]]>Prototool
See how a good injection molding company can ensure the production quality of their clients' products through the key points of mold closing.
The post Understanding the Complete Steps of Mold Closing: Preventing Mold Damage from the Root appeared first on Prototool written by Prototool.
]]>Prototool
Mold closing is a crucial process in injection molding, where precision and control are paramount. This article delves into the detailed steps of mold closing, highlighting the significance of each phase to prevent mold damage and ensure the longevity and accuracy of the molds.
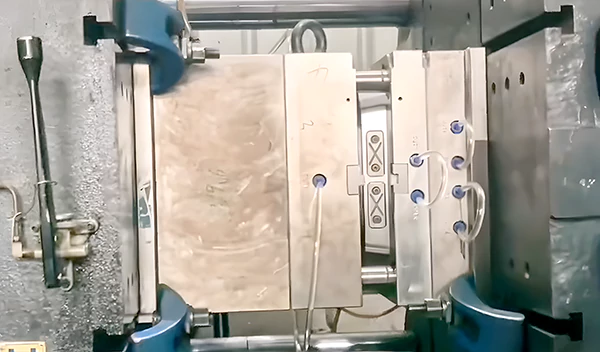
Initiating Mold Closing
- Starting Pressure for Mold Closing: Initially set at 25, this pressure may need adjustment if the speed is too slow. Incrementally increase the speed by +5 until the desired velocity is achieved. Be cautious, as high pressure can cause rapid movement changes in the moving platen, leading to increased friction and wear on the machine parts, affecting stability and precision.
- Starting Speed for Mold Closing: This should be set based on actual requirements, ensuring a smooth transition to the next phase without abrupt pauses. Ideally, higher speed settings with lower pressure are preferred, using pressure to control speed.
Low-Pressure Mold Closing
This phase involves using low pressure and speed to close the mold, starting from a safe distance until complete closure.
Low-Pressure Mold Closing Speed: The speed should be slow to minimize impact damage, even with low pressure settings. Sudden obstacles like misaligned sliders or broken ejector pins can cause significant damage under high-speed conditions.
Low-Pressure Mold Closing Pressure: Begin with high speed and low pressure, like 5, for testing. The mold closing speed won’t be too fast due to low pressure, allowing for gradual pressure increase to achieve the ideal protective speed.
Starting Position for Low-Pressure Mold Closing: This varies significantly based on mold size and structure, generally between 5-20 cm before complete closure. It’s crucial to start low-pressure protection early to avoid high-speed impacts from previous stages.
Ending Position for Low-Pressure Mold Closing: Set this parameter where the mold just fully closes. Initially, set the low-pressure speed and pressure, then fine-tune the position based on manual testing to ensure precise mold protection.
High-Pressure Mold Clamping
High-pressure mold clamping is a critical phase in the mold closing process, where the mold, having been brought together under low pressure, is now securely locked in place. This step ensures the mold’s stability and precision during the injection molding process.
High-Pressure Mold Clamping Pressure:
The initial setting for the clamping pressure is typically around 60. However, this value may need to be adjusted based on the specific requirements of the mold and the material being used. If the initial pressure setting does not achieve the desired results, it should be increased incrementally, in steps of +10. It’s important to avoid excessive pressure, as this can unnecessarily strain the machinery and lead to increased wear and tear. The goal is to apply just enough pressure to securely lock the mold without overburdening the equipment.
High-Pressure Mold Clamping Speed
The speed at which the mold is clamped should start at a reference value, such as 25. If the initial speed is insufficient, it can be increased gradually, but caution is advised. Increasing the speed too much can lead to excessive noise and vibration, which can be detrimental to both the machinery and the mold. The speed should be adjusted only after evaluating the effectiveness of the pressure setting. A balanced approach to adjusting both speed and pressure is crucial for achieving optimal clamping without causing damage.
Monitoring and Adjustments:
Continuous monitoring during high-pressure clamping is essential. Observing the behavior of the mold and the machine during this phase can provide valuable insights into whether the settings are appropriate or need further adjustment. Factors such as the mold’s response to pressure, the sound and vibration levels of the machinery, and the overall stability of the system should be carefully evaluated.
Final Locking Position:
The final locking position is a critical parameter in high-pressure mold clamping. This position should be set so that the mold is completely and securely closed. It’s important to ensure that the mold has reached its fully closed position before the high-pressure clamping is initiated. Incorrect settings in this regard can lead to incomplete mold closure, resulting in defects in the final product.
Safety Considerations:
Safety is paramount during high-pressure mold clamping. The high forces involved in this process require that all safety protocols be strictly adhered to. This includes ensuring that the machine is in good working condition, that all safety guards are in place, and that operators are trained to handle the equipment safely.
Conclusion: Ensuring Quality and Efficiency in Mold Closing
Understanding the nuances of mold closing, from low-pressure protection to high-pressure clamping, is essential for maintaining mold integrity and production quality. By carefully managing pressure and speed, we can prevent mold damage, ensuring efficient and cost-effective production.
The post Understanding the Complete Steps of Mold Closing: Preventing Mold Damage from the Root appeared first on Prototool written by Prototool.
]]>Prototool
By studying the case of cup overmold design analysis, see how good injection molding companies perfectly complete the whole manufacturing.
The post Cup Overmold Design Analysis In UG/NX Software appeared first on Prototool written by Prototool.
]]>Prototool
Overmolding, a technique familiar to experienced designers, presents unique challenges in its application, particularly in modern mold design. Today we will analyze a case of cup overmold to showcase a practical approach to this advanced manufacturing process. We will explore how UG/NX software can be leveraged to create precise and efficient overmolding designs for cups, a common yet complex product in the plastic manufacturing industry.
The First Stage of Cup Overmolding
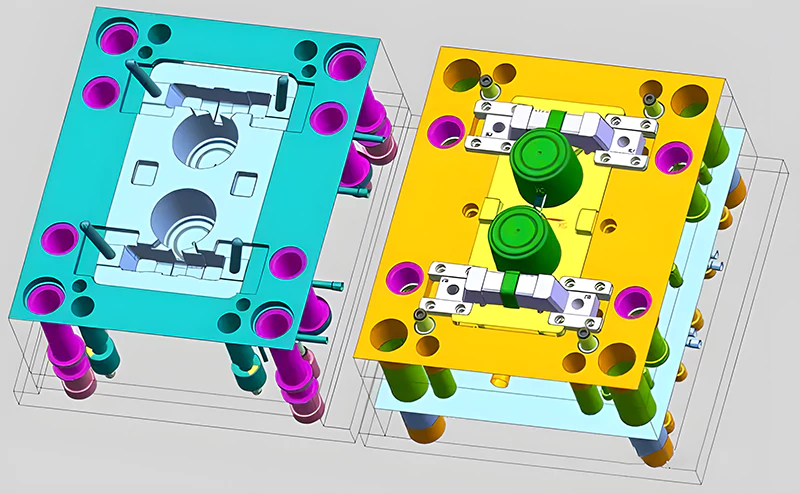
Achieving perfection in overmolding requires more than basic mold design knowledge. It involves understanding the nuances of subsequent processes to ensure flawless results for the client. The first stage of cup overmolding is critical as it sets the foundation for the final product. It involves creating the inner structure of the cup, which must be designed to support the outer layer added in the second stage. This stage requires meticulous planning to ensure that the inner layer has the right thickness, material consistency, and is free of defects.
The Second Stage of Overmolding
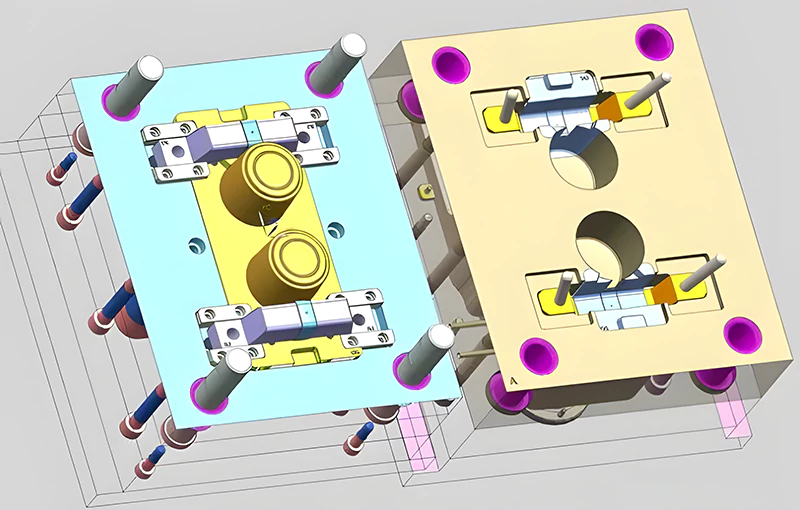
The second stage of overmolding is where the outer layer of the cup is added. This stage demands precision in aligning the two parts of the mold and ensuring that the second material bonds correctly with the first. The challenges here include avoiding shrinkage, preventing flash (excess material), and maintaining the overall aesthetic quality of the cup. This stage is where the designer’s expertise in material properties and mold design truly shines, as they must anticipate and counteract any potential issues that could arise from the overmolding process.
Preserving Aesthetics with Pin-Point Gate Injection
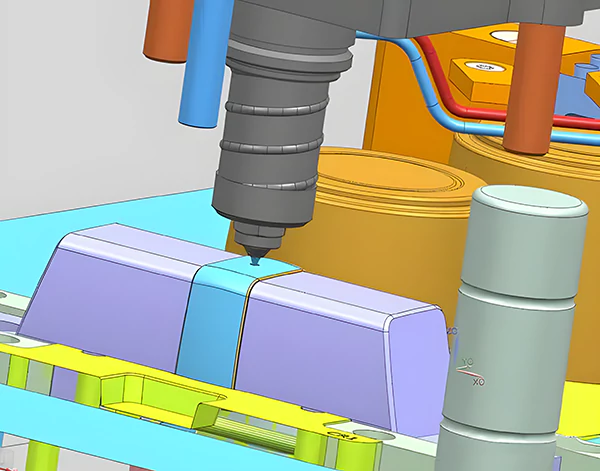
In cup overmolding, aesthetics are as important as functionality. The pin-point gate injection method is a sophisticated technique used to enhance the appearance of the final product. This method allows for precise control over where the material enters the mold, reducing the visibility of the injection points and ensuring a smooth, clean finish on the cup’s surface.
3D Model of a Plastic Cup
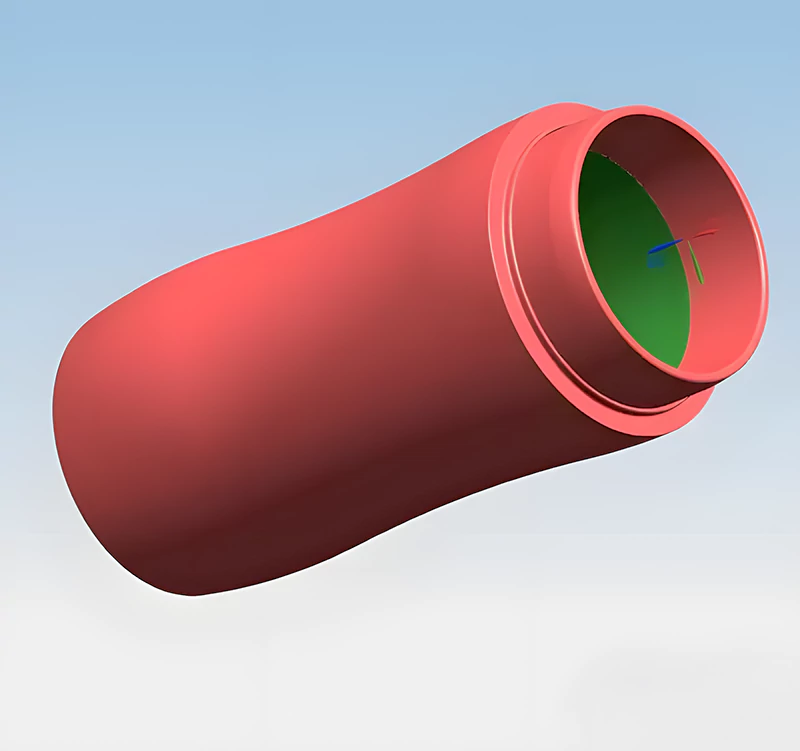
The 3D modeling of a cup in UG/NX software is a crucial step in visualizing and planning the overmolding process. The software allows designers to simulate different materials and molding stages, ensuring that the final product meets the required specifications. For a cup made of PC material with a thickness of 17MM, 3D modeling helps in identifying potential issues like shrinkage and bubble formation during the injection molding process.
Details Of Cup Overmold Design
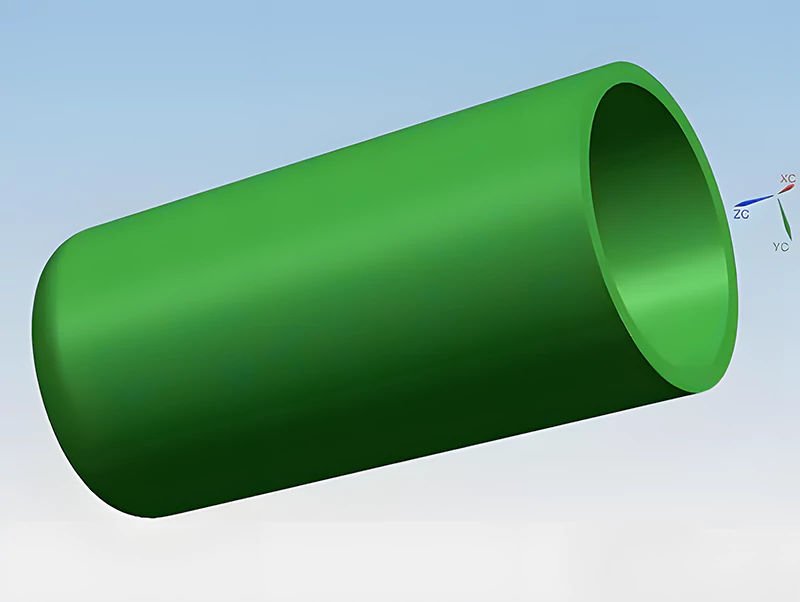
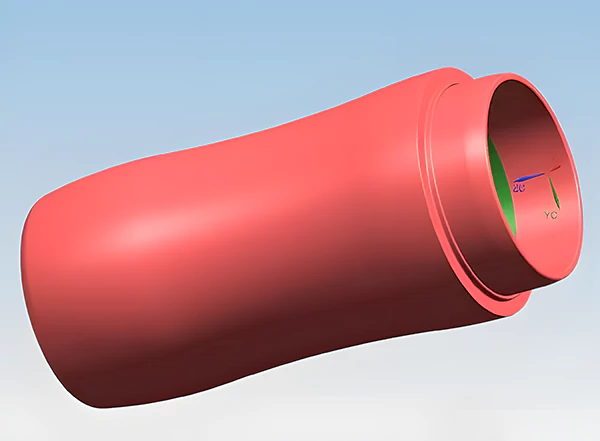
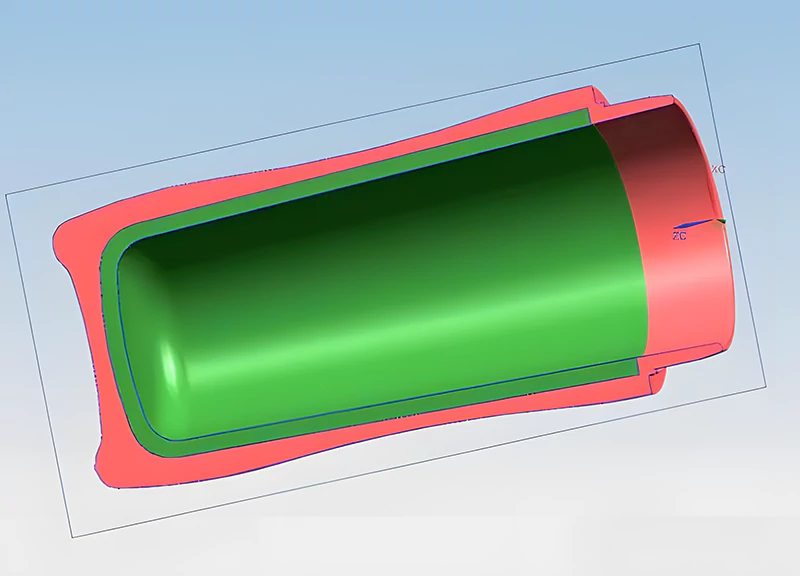
The detailed 3D models of both the first and second molding stages provide a clear view of the internal and external structures of the cup. This visualization is crucial for understanding how the two components will interact and bond during the overmolding process. The cross-section view offers insights into the thickness distribution and potential stress points, which are vital for ensuring the durability and quality of the cup.
Large Sprue Injection in the First Stage
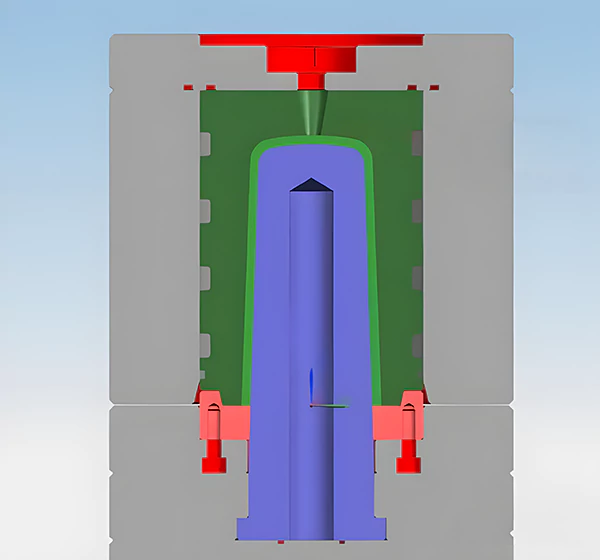
The choice of sprue size and placement in the first stage of overmolding can significantly impact the final product’s appearance, especially for transparent materials. Large sprue injections, while easier to manage, can leave visible marks that detract from the cup’s aesthetic appeal. This section highlights the importance of balancing ease of manufacturing with the final product’s visual requirements.
Final Overmolding Effect
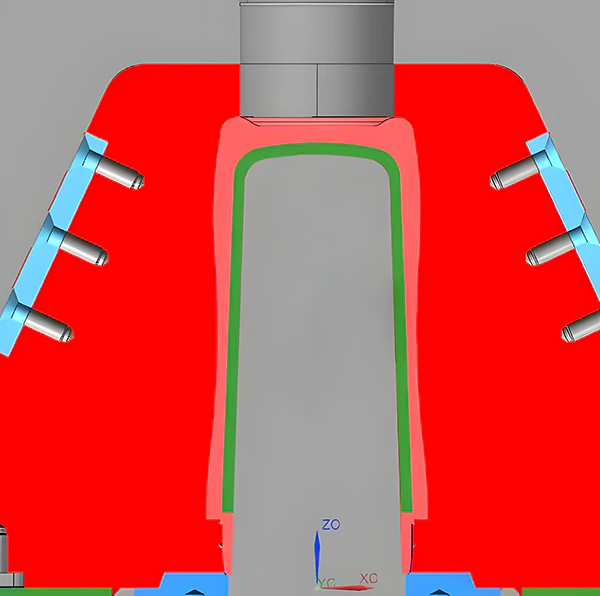
The final overmolding effect is a testament to the precision and skill involved in the entire process. By using a pin-valve hot runner system in the second stage, any imperfections from the first stage, such as sprue marks, are effectively eliminated. This results in a cup that not only meets functional requirements but also possesses a high-quality finish that appeals to consumers.
Conclusion
Cup overmolding in UG/NX software demands a blend of technical expertise and practical experience. By understanding the complexities of each stage and employing advanced techniques, designers can achieve superior quality in their overmolded products. This process exemplifies the intricate balance between aesthetic appeal and functional integrity in product design.
The post Cup Overmold Design Analysis In UG/NX Software appeared first on Prototool written by Prototool.
]]>Prototool
Understand the main considerations, innovative technologies, and standards in plastic remote control mold design used by top suppliers.
The post Key Points and Analysis in Designing Plastic Remote Control Molds appeared first on Prototool written by Prototool.
]]>Prototool
The remote control mold design not only dictates its functionality but also it is aesthetic appeal and user experience in consumer electronics. Prototool’s journey in creating a plastic remote control mold design combines innovation with precision. This offers a glimpse into the meticulous process of bringing a simple yet essential gadget to life.
Client’s Remote Control Product Requirements
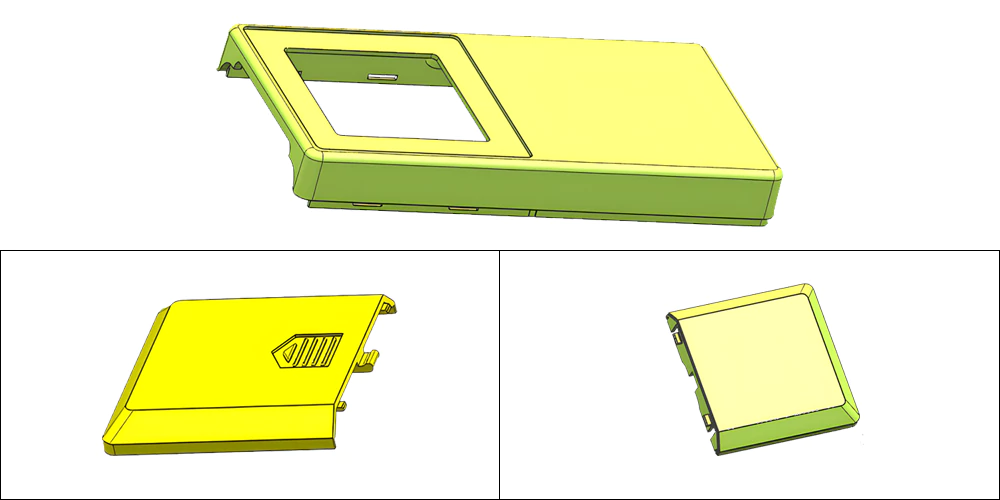
The remote control casing typically comprises a top shell and a bottom shell, as illustrated in Figure 1. The top shell’s maximum dimensions are 100.00 mm x 50.00 mm x 10.00 mm, with an average wall thickness of 1.50 mm. Made from ABS material, the top shell has a shrinkage rate of 1.005 and weighs 10.55 grams. It is imperative that the plastic parts are free from defects such as weld lines, short shots, flow marks, air pockets, warping, silver streaks, cold slugs, and jetting, and they must comply with ROSH environmental standards.
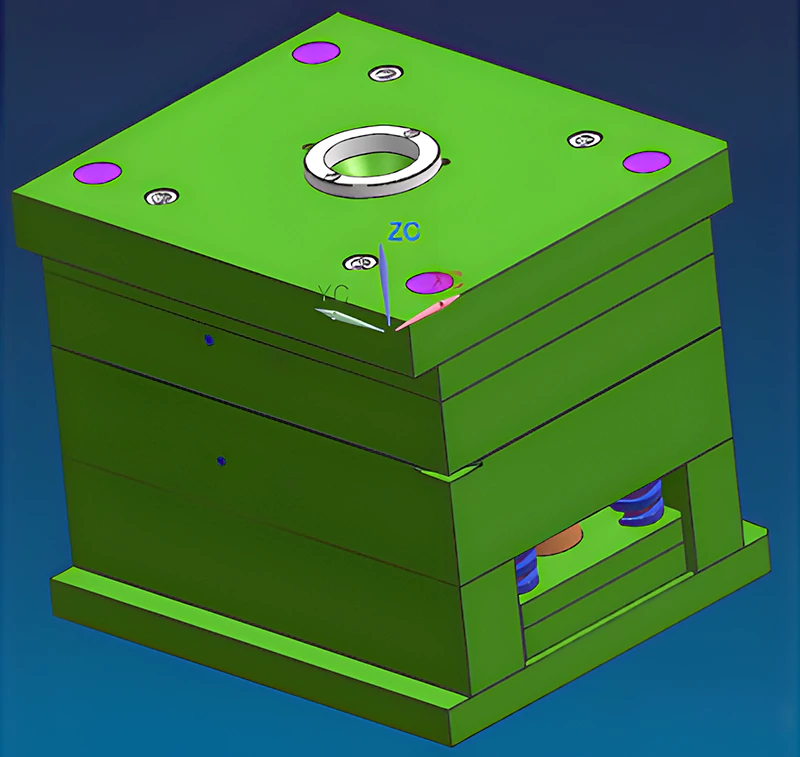
Structure Analysis And Mold Design Of The Remote Control Product
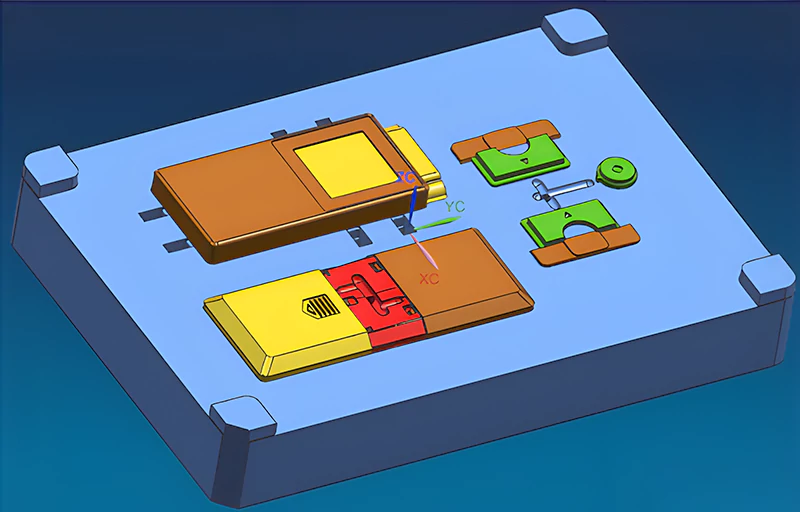
The remote control’s top and bottom shells consist of three plastic parts. The top shell is a single piece, while the bottom shell includes a battery cover. The overall design of these parts is a flat frame structure, connected along the perimeter through snap-fits. These snap-fits require the design of angled lifters or lateral sliders for core pulling mechanisms.
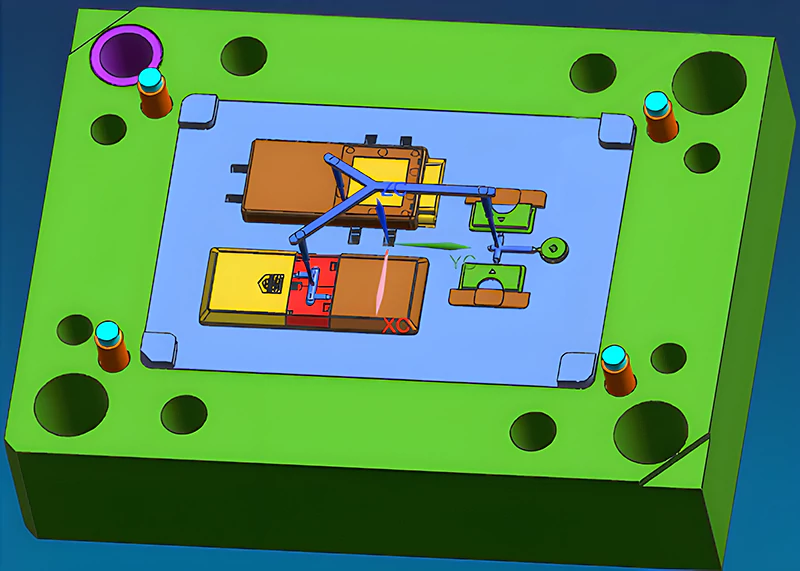
As shown in Figure 3, the mold layout adopts a family mold design. This design includes the top shell, bottom shell, battery cover, and three internal small components. Family molds are advantageous in prototype stages or small-scale production due to their cost-effectiveness. However, they present challenges in high-precision products because achieving balanced runner systems is difficult. This complication makes the injection molding process more complex. For series production, flow switch components can be designed to adjust production quantities based on demand.
Mold Assembly and Precision
Figure 3 shows the arrangement of the six plastic parts to achieve a balanced runner system. The mold design utilizes a simplified FCI3040 A60 B90 standard mold base with S136 for the cavity and NAK80 for the core. We position the cavity and core using a four-corner inter-lock method. This must align with the mold core structure to save steel and reduce machining time. Sometimes, the direction of the inter-lock considers cavity strength. In this case, the cavity side is recessed and the core side protrudes to tighten and prevent cavity expansion under injection pressure. The inter-lock’s side angle, typically between 5° to 10°, significantly impacts mold closing precision. The smaller the angle, the higher the precision.
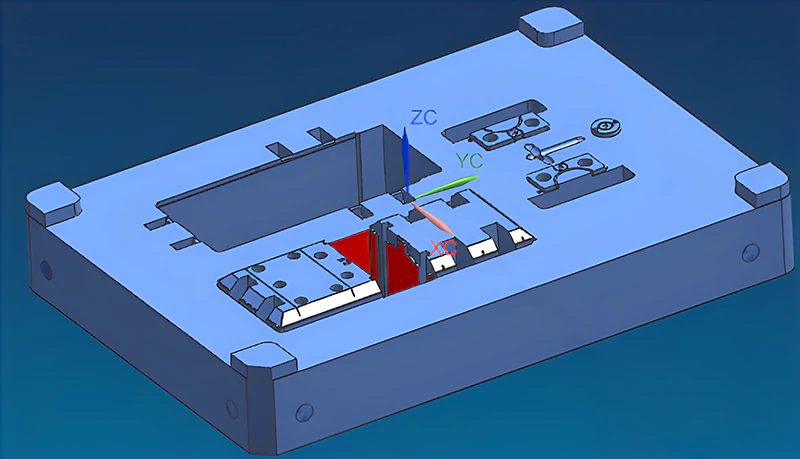
Side Snap-Fits and Ejection Mechanism
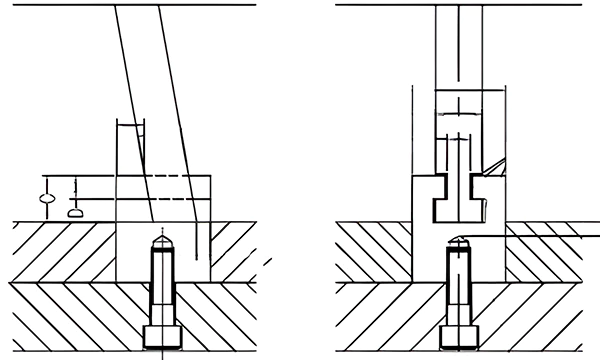
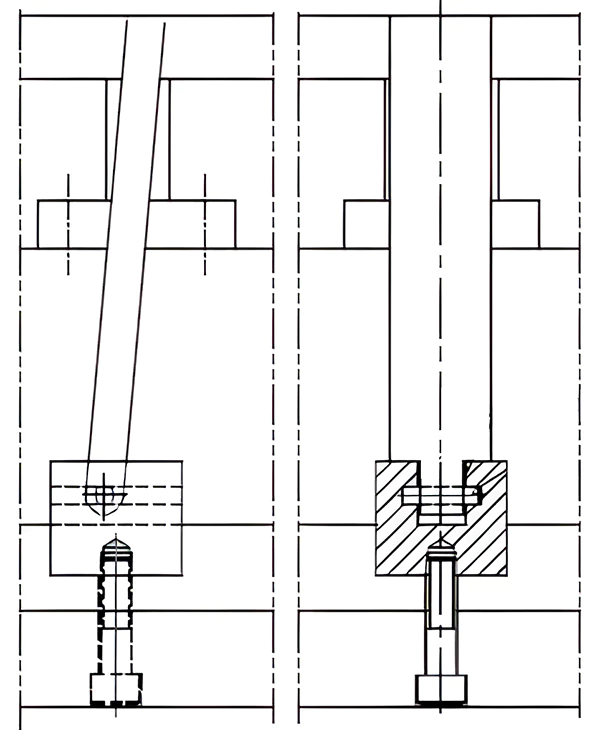
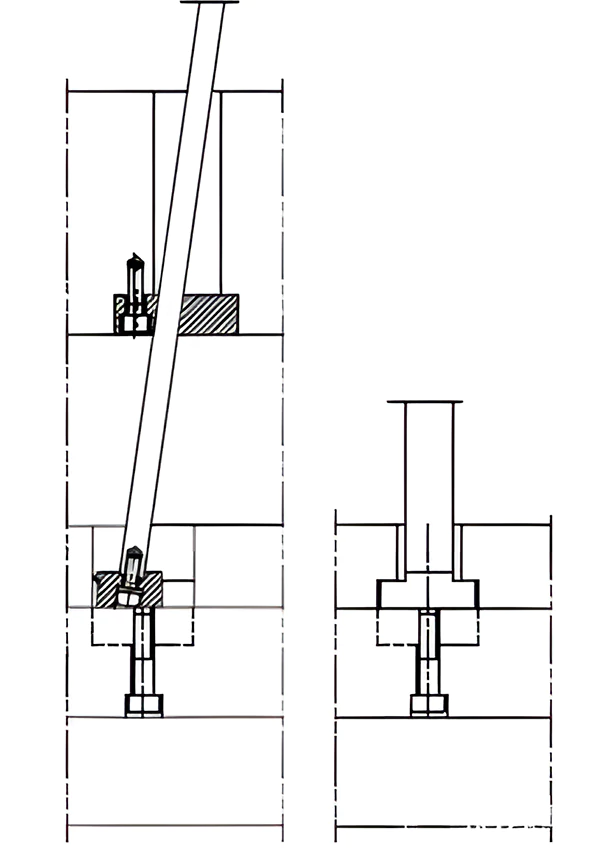
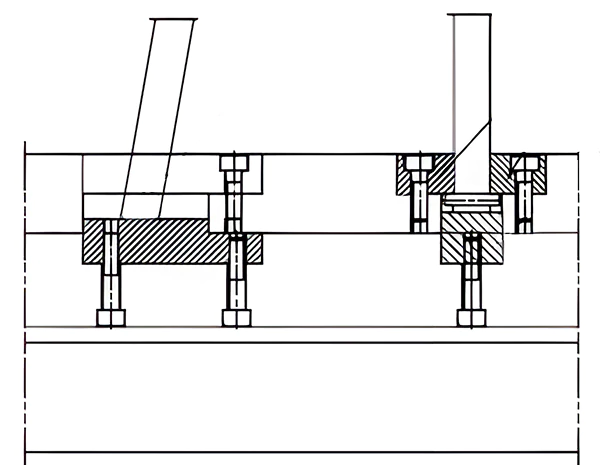
The side snap-fits of the top and bottom shells are resolved using angled lifters for ejection. There are various angled lifter structures, commonly using T-slot or roller drives. Due to the small size of the plastic parts and limited space, the guide block for the small angled lifter is designed on the back of Plate B. Figures 6 and 7 illustrate the T-type angled lifter seat and the pin structure angled lifter seat, respectively. The pin diameter should be at least ø4mm, and the slider seat hardness above HRC40.
Innovations in Angled Lifter Design
Figure 8 displays a screw-connected angled lifter seat structure. In this structure, the lifter seat is screwed to the bottom of the angled lifter, with a spring washer underneath to prevent loosening. Adding wear blocks to the push plate facilitates maintenance and replacement after wear. Figure 9 presents an improved version of the pin structure angled lifter seat. The pin diameter is at least ø4mm, and the flat bottom surface of the angled lifter bears the injection pressure, significantly improving the force condition compared to the design in Figure 7.
Conclusion
In designing plastic remote control molds, attention to detail in every component—from the mold layout to the ejection mechanism—is crucial for producing high-quality, defect-free plastic parts. By adhering to these design principles and leveraging innovative techniques, manufacturers can ensure efficient production and meet stringent environmental and quality standards.
The post Key Points and Analysis in Designing Plastic Remote Control Molds appeared first on Prototool written by Prototool.
]]>Prototool
Discover the critical aspects of fan blade mold design, including balance principles, material considerations & factory's molding techniques.
The post Key Points in Mold Design and Injection Molding for a Well-Known Brand’s Fan Blades appeared first on Prototool written by Prototool.
]]>Prototool
When a fan rotates, its angled blades continuously push the air from behind forward, creating wind through air shearing. The centrifugal force generated by the rotating fan blades directs the airflow. The maximum wind force and speed occur when the blades are at a 45-degree angle to the centerline, with the most dispersed wind at 90 degrees. From a mechanical perspective, fan blades are typically odd-numbered, with 3 or 5 blades being common. This asymmetry helps in energy efficiency. When one blade is at a low energy potential, the others, being at a higher potential, can easily drive it using inertial forces.
Design Specifications of the Fan Blade
A well-known brand’s fan blade product measures ø335.50 mm x 42.30 mm. It has an average wall thickness of 3.20mm, is made of PP material, and has a shrinkage rate of 1.008. The design incorporates a stainless steel insert at the center of the plastic part to enhance wear resistance. The technical requirements stipulate no defects like peaks, insufficient injection, flow lines, pores, warping, silver streaks, cold material, jetting, or bubbles. The use of mold release agents is prohibited during the molding process.
Principles of Fan Blade Mold Design
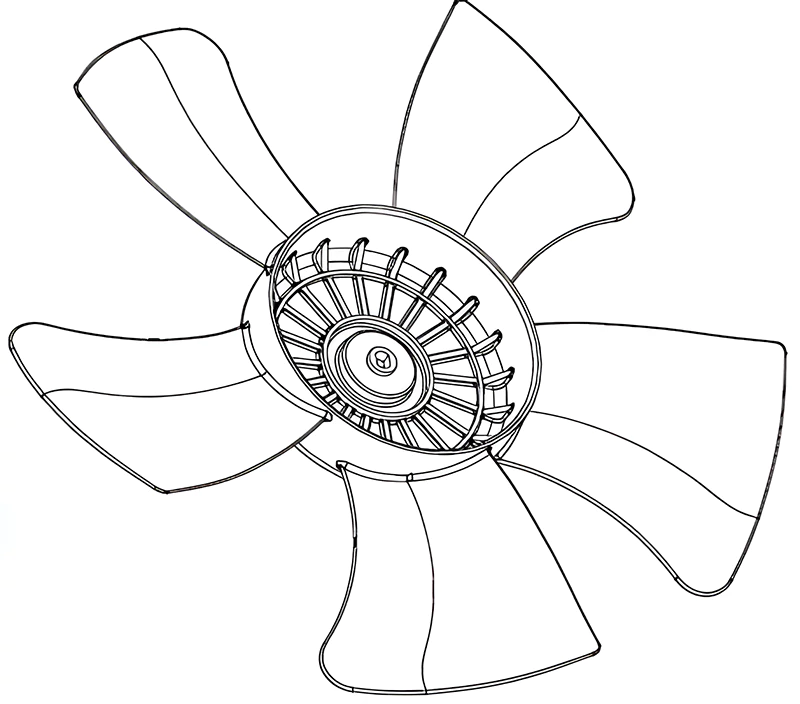
The fan blade part, as shown in Figure 1, has a relatively simple design. This article discusses the design and manufacturing highlights of fan blade molds. It focuses on two primary requirements: the principle of center of gravity alignment and dynamic balance. Poor-quality fans often suffer from “eccentricity” due to manufacturing defects, leading to noise, vibration, and increased wear over time. Ensuring balance in mold design and improving manufacturing processes are crucial for high-quality fan blade production.
Mold Layout and Gating System
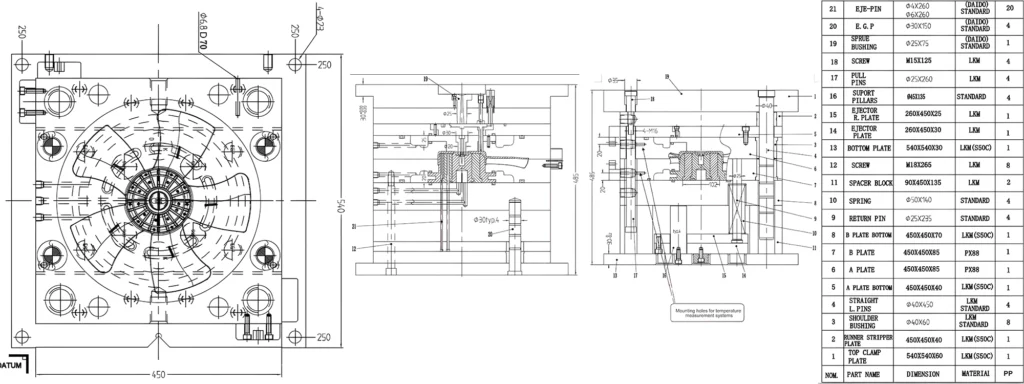
The part is nearly circular, with 5 blades evenly distributed along the perimeter. Given its size, the mold cavity layout is 1×1, with the mold base being FAI 4545 A60 B60 C135. The fan blade shape necessitates a point gate injection system. The large size of the part requires 5-point gates. Each is located near the edge of the central dome, close to each blade, as illustrated in Figure 2. A balanced gating system ensures even distribution of material, crucial for the dimensional and weight uniformity of each blade.
Mold Structure and Cooling System
The mold structure is straightforward, lacking complex sliders or inclined mechanisms. All design and machining aspects revolve around “balance.” The design of the mold’s cooling system achieves equilibrium. It is sandwiched between front plates 5 and 6 and rear plates 7 and 8. The system features large circular cooling channels and sealing rings. Strategically, we place thermocouples on the A plate and B plate to monitor and control temperature.
Machining and Assembly for Precision
Balancing is not only crucial in mold design but also in machining. The front and back mold cores require high-speed machining with high-quality tools and new blades to ensure identical shape and dimensional tolerances for each blade. After precision machining, a 3-coordinate inspection is mandatory before assembly.
Rapid mold clamping is essential in modern injection molding for efficient production. This mold uses a mechanical rapid clamping system with V-grooves designed on the fixed and moving mold plates, with tight tolerances on width, angle, and plate thickness.
The connection between the 5 blades and the central dome is a tilted joint, requiring the front and back mold cores to interlock. A small draft angle of 0.25º on the outer side of the dome’s sidewall meets aesthetic requirements without hindering demolding, considering the PP material.
The post Key Points in Mold Design and Injection Molding for a Well-Known Brand’s Fan Blades appeared first on Prototool written by Prototool.
]]>Prototool
Explore expert solutions in soymilk maker housing mold design and production. Connect with leading suppliers skilled in crafting high-quality
The post Soymilk Maker Housing Mold Design Analysis appeared first on Prototool written by Prototool.
]]>Prototool
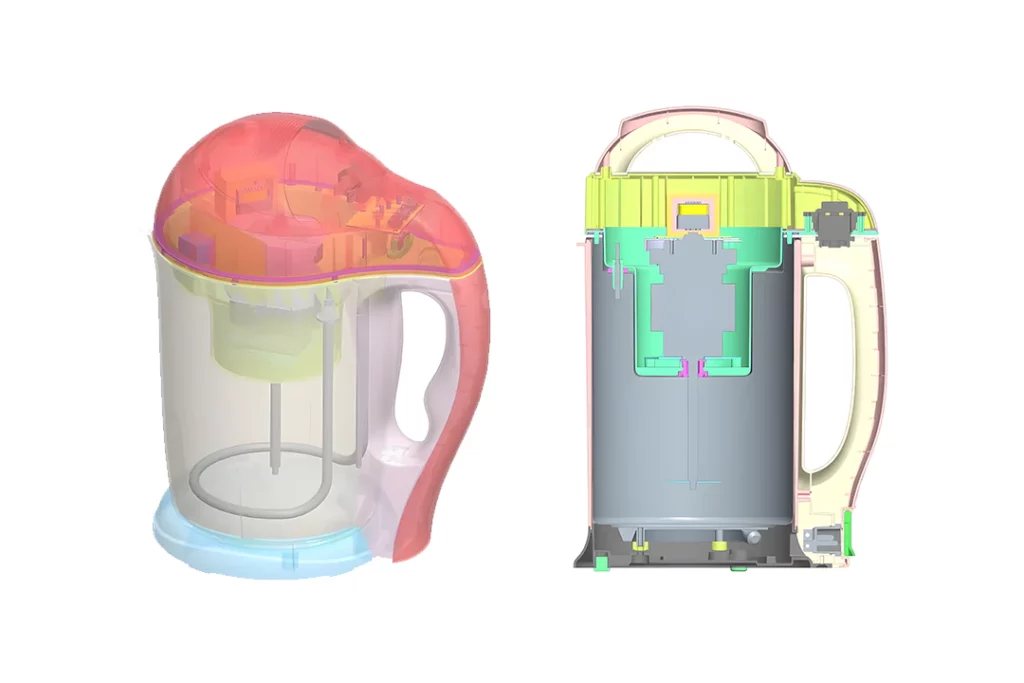
In this exploration of soymilk maker housing mold design, we delve into the case study of a soymilk maker’s head unit, analyzing the intricacies of injection molding design for home appliance products.

Material Selection for Durability and Aesthetics
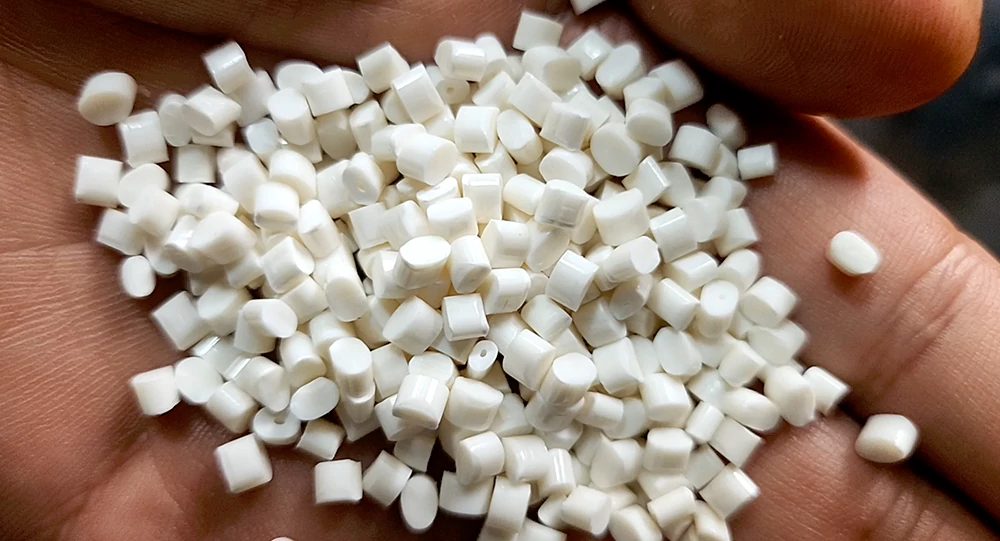
In soymilk maker housing mold design, the choice of materials is crucial. In general, in the material selection process, soymilk maker housings primarily utilize PP (Polypropylene) and ABS (Acrylonitrile Butadiene Styrene). ABS boasts excellent flowability, low shrinkage, strong heat resistance, and impact resistance, making it a popular choice. Products made from ABS exhibit a high-quality surface gloss and wear resistance. On the other hand, PP material, while having good injection molding properties, tends to have a high shrinkage rate, leading to potential deviations in product precision and deformation. Additionally, PP can suffer from issues like poor gloss and shrinkage marks, though it is more cost-effective than ABS. Considering the need for high gloss and temperature resistance in soymilk maker housings, ABS is the preferred material choice.
Designing Screw Columns and Reinforcement Ribs
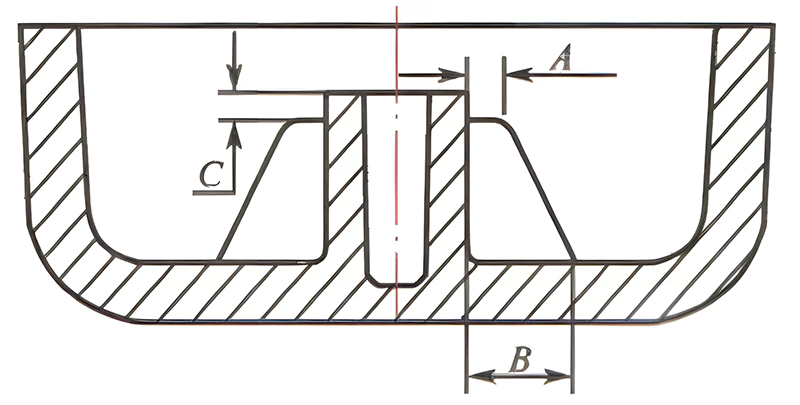
For assembly purposes, the soymilk maker’s head unit housing requires several screw columns. The design includes volcano treatment at the base to prevent shrinkage marks. Reinforcing ribs enhance the strength of each screw column. It’s essential to control their thickness carefully and include adequate R angles to improve the solvent’s flow. In the design of the gating system, the housing must be smooth, with minimal residual marks post-demolding. This necessitates the use of point gating to allow the gate to detach naturally. Designers must develop a balanced runner system from direct to point gating, utilizing a circular manufacturing process to reduce runner volume, save injection time, and enhance production efficiency.
Molding Process and Precision
In this soymilk maker design, the head unit’s housing is secured using a snap-fit concave groove. The mold design incorporates lateral parting core pulling and inclined top structures. Two factors influence the dimensional accuracy: the variability of the plastic’s shrinkage rate and mold processing errors. For surface quality control, the housing requires flawless internal and external surfaces, with smooth edges free from weld lines or spots. The internal surface roughness standard is Ra0.4μm, and the external surface is Ra0.2μm. Surface gloss issues are often due to premature cooling of the melt, insufficient drying time, inadequate mold temperature, or substandard polishing.
Addressing Injection Molding Defects
Shrinkage Issues
Shrinkage in injection-molded housings is often related to the internal structure and excessive thickness of ribs. This can cause abnormal solidification during cooling, leading to surface depressions. To mitigate this, the injection molding process must be optimized with scientific shrinkage prevention measures. You should control the thickness of the ribs within reasonable limits, utilizing the lower shrinkage rate of ABS material. For PP, with its higher shrinkage rate, the rib thickness should generally be one-third of the main rib thickness. A combination of internal and external structural considerations is necessary to prevent shrinkage in the housing.
Short Shots
This issue arises from overly thick mold design structures, poor venting, or uneven wall thickness. To address this, you should scientifically set the injection pressure, gradually increasing it until achieving the desired fill. If issues persist, the injection mold may need to be adjusted, including changing the gate position and conducting feasibility tests until successful molding is achieved.
Weld Lines
Weld lines on the surface of home appliance housings are often due to the addition of aggregates beyond normal processing requirements, leading to hidden marks or cracks under external forces. Increasing mold temperature and injection pressure can resolve this. If problems persist, enlarging the gate size may be necessary.
The post Soymilk Maker Housing Mold Design Analysis appeared first on Prototool written by Prototool.
]]>